How to Add Collaborators on GitHub (2026 Step-by-Step)
Learn how to add collaborators in GitHub for personal and organization repos. A practical guide for founders, PMs, and developers managing team access.
By Rishav
20th Jan 2026
Last updated: 16th Apr 2026

Adding someone to your GitHub repository is one of the first and most critical steps in building a mobile app with a team. It all happens right from your repository's Settings tab. From there, you'll head to the "Manage access" section, click the big green "Invite a collaborator" button, and search for your teammate by their GitHub username, full name, or email.
Your Quick Guide to GitHub Collaboration
Getting a teammate involved in your GitHub repository is a must for any real-world project. Maybe you're a founder sharing an early MVP with a freelance developer, or you're a designer handing off assets to the engineering team. Granting access is a fundamental part of the modern development workflow.
This guide isn't just for developers. We've designed it for the entire product team—founders, PMs, and designers—so anyone can manage repository access with confidence.

Let's say you've just roughed out a new mobile app prototype in React Native and need to bring on a developer to start building it out. You can handle all of this through the GitHub web interface; no command line is necessary for this part. It’s a simple action, but it's the cornerstone of how over 100 million developers work together on the platform.
The scale of this collaboration is massive. Monthly merged pull requests recently hit 43.2 million, a jump of 23% year-over-year. That growth is fueled by these exact collaborator invites.
Choosing the Right Permission Level
Before you hit "send" on that invitation, take a moment to think about the level of access your collaborator actually needs. It’s a crucial step. Giving someone too much permission opens up potential security risks, but giving them too little can grind their work to a halt. This is especially true for React Native developers and engineering teams who are often trusted with sensitive codebases.
The principle of least privilege is your best friend here. Always grant the minimum level of access a person needs to do their job effectively. This simple practice protects your project as your team grows.
To help you decide, let's look at the different permission levels you can assign in a personal repository. Each one unlocks a specific set of capabilities, allowing you to tailor access perfectly, whether you're adding a designer who just needs to view the code or a senior engineer who needs to merge pull requests.
Here’s a quick breakdown to help you make the right call.
GitHub Collaborator Permission Levels at a Glance
| Permission Level | What They Can Do | Ideal For |
|---|---|---|
| Read | View code, open/comment on issues, and see pull requests. Cannot push code. | Non-technical stakeholders, QA testers, or designers who need to review work. |
| Triage | All Read permissions, plus manage issues and pull requests (e.g., add labels). | Project managers or team leads who help organize the repo but don't write code. |
| Write | All Triage permissions, plus push code to the repository. | Developers and engineers who are actively contributing code to the project. |
| Maintain | All Write permissions, plus manage some repository settings (but not destructive actions). | Senior developers or trusted contributors who help manage the repository itself. |
| Admin | Full control over the repository, including sensitive and destructive actions. | Co-owners of the project or lead maintainers. Use this permission sparingly. |
Choosing the right role from the start keeps your repository secure and your workflow smooth. When in doubt, start with a lower permission level—you can always increase it later if needed.
Adding Collaborators to Your Personal Repositories
When you're a founder, a solo dev, or just part of a small team, the quickest way to get a project off the ground is by sharing a personal repository. This is the most straightforward method for granting access without the overhead of setting up a formal GitHub Organization. It’s perfect for getting a small, trusted group collaborating fast on an early-stage mobile app.
Let's imagine a common scenario. You're a product manager with a new mobile app prototype living in a private repository. You need to loop in your UX designer to review the code and make sure the initial screens align with the Figma designs. The key here is you don't want them pushing code directly—you just need their eyes on it.
This is exactly what collaborator permissions are for. You'll grant them Read access, which gives them a window into the project without letting them make direct changes.
Finding the Right Settings
First things first, head over to the main page of the repository you want to share. Look right under the repository's name and you'll see a row of tabs: <> Code, Issues, Pull requests, etc.
Go ahead and click on the Settings tab, which is usually the last one on the right.
Once you're in the settings, look at the sidebar on the left. You’ll find a section called "Access." Under that, click on Collaborators. This is your command center for managing who has direct access to this specific project.
Sending the Invitation
On the "Manage access" page, you'll see who already has access. To bring someone new into the fold, click the big green Add people button.
A search box will pop up. You can find the person you want to invite in a few ways:
- Their GitHub username (the most reliable way)
- Their full name, if it’s on their profile
- The email address they use for their GitHub account
Once you type in their info and select the right person from the list, you’ll get a dropdown menu to set their permission level. For our UX designer, you’d simply select Read. Click the final "Add [username] to this repository" button, and GitHub will shoot off an invitation.
Key takeaway: Your collaborator won't get access right away. They have to accept the invitation first. Until then, you'll see a "Pending Invite" status next to their name, so you always know who's in and who still needs to accept.
What Your Collaborator Sees
Your new teammate will get an email from GitHub letting them know you've invited them to collaborate. It’s pretty clear and has a big "View invitation" button.
They’ll also see a notification at the top of their GitHub dashboard the next time they log in. Clicking either the link in the email or the dashboard notification takes them to a page where they can review the details and either accept or decline.
The moment they hit Accept invitation, they're in. They'll have the exact access level you set, and their status on your collaborator list will update instantly. It's a clean, simple process that keeps everyone in the loop.
Managing Project Access With GitHub Organizations
When your mobile app project starts to pick up steam, moving beyond just you and maybe one other developer, managing permissions gets messy, fast. Inviting collaborators one-by-one to a dozen different repositories isn't just a headache; it's a security risk waiting to happen. This is exactly why GitHub Organizations exist—they're built for scaling your team without the chaos.
Think of an Organization as the central command center for all your company's code. Instead of manually giving a new engineer access to the main app repo, the component library, and the documentation site, you just add them to a single team. Boom. They instantly get the right permissions for everything they need. That’s the real power of an org over a personal account.
This flow chart breaks down the fundamental steps, whether you're adding one person to a personal project or a new member to a full-blown organization.
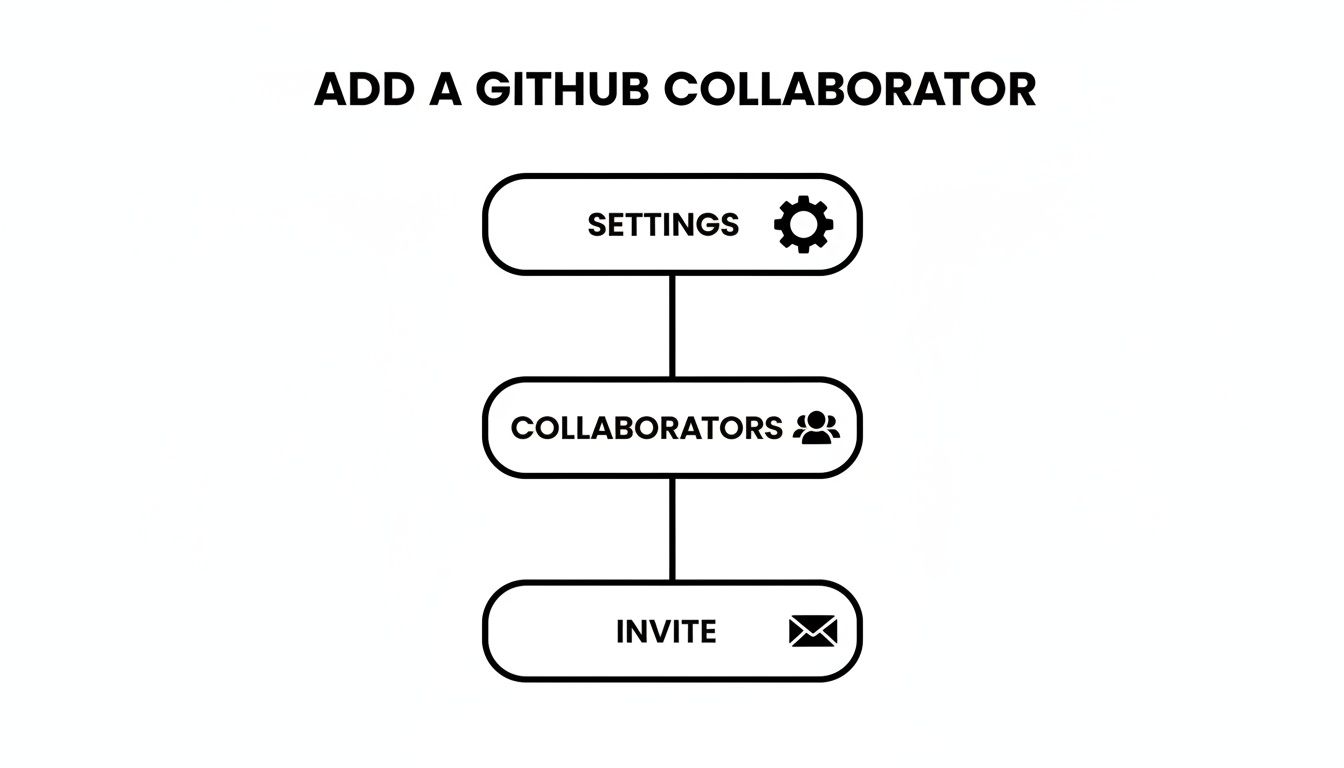
It really boils down to navigating to your settings, finding the access management section, and sending out that invite. Simple, right?
Creating Teams for Granular Control
The real magic within an Organization is the ability to create teams that mirror your company’s actual structure. It's incredibly practical. For a mobile app startup, you might set things up like this:
- MobileDevs: This team gets Write access to all the core application repositories. When a new developer joins, you add them here, and they're ready to start committing code on day one.
- QA-Testers: You could give this team Read access to the main app and Triage access to the bug-tracking repo. That lets them report and manage issues without having the ability to push code.
- Designers: They might only need Read access to the repositories to pull down the latest build, review the UI implementation, and make sure it matches the mockups.
This kind of structure is a game-changer for how you operate. Onboarding new hires is a breeze, and offboarding is just as clean—simply remove them from the team. You always have a clear, high-level view of who can access what. This is how modern development teams stay agile and secure, a principle well-understood by enterprises adopting new technologies.
How Organizations Improve Security and Workflow
Switching to an Organization unlocks a whole new level of detailed permissions and security features. You can establish base permissions that apply to every member and then grant more specific, elevated access on a team-by-team basis. This lines up perfectly with the principle of least privilege, a core security concept that ensures nobody has more access than they absolutely need to do their job.
The impact of this collaborative model is huge, and you can see it in GitHub's Octoverse report. Teams on GitHub are closing a staggering 4.25 million issues every month. While over 20% of the platform's 3.5 billion contributions are public, private contributions shot up by 38%, driven largely by the robust permissioning that Organizations provide.
This controlled environment also leads to better security outcomes. Teams fixed 12 million vulnerabilities using shared alerts—a 20% increase from the previous year. It's clear that structured collaboration isn't just about convenience; it's about building more secure software.
Using the GitHub CLI for Faster Invitations
While the GitHub web interface is perfectly fine for adding a collaborator here and there, many developers and technical managers live in the terminal. If that's you, the GitHub Command Line Interface (CLI) is an absolute game-changer for managing repository access without ever touching your mouse.
Instead of clicking through menus, you can send an invite with a single command. This approach is incredibly efficient, especially when you're automating project setups or onboarding a whole team of engineers at once.
Inviting Collaborators from the Terminal
Picture this: you're a lead developer kicking off a new project. You need to give your entire five-person engineering team write access to the new repo. With the GitHub CLI, you can knock this out in less than a minute.
The command you'll want to get familiar with is gh repo invite. It’s clean, simple, and lets you specify the user and their exact permission level all in one shot.
The basic structure looks like this:
gh repo invite <repository> <username> --permission <permission-level>
Let's use our scenario. To add a developer with the username dev-jane to a new mobile app repository called project-sparrow and give them write access, you’d run this command:
gh repo invite project-sparrow dev-jane --permission write
And that's it—invitation sent. You can fire off the same command for each team member, making the whole process fast and repeatable. For anyone deep in code, mastering tools like the CLI is a major productivity win, kind of like having access to copyable code snippets that speed up your daily workflow.
Managing Access with Other CLI Commands
The CLI isn't just a one-trick pony for sending invites; it's a full-fledged toolkit for managing repository access. After adding collaborators, you'll inevitably need to check who has access or, just as critically, remove someone when they transition off the project.
Remember, repository access should never be "set it and forget it." Regular access audits are a security best practice, and the CLI makes this a painless, quick task.
Need a quick rundown of everyone who has access to your repository? The list command has you covered.
- List collaborators:
gh repo list --collaborators
And when it's time to revoke someone's access, the remove command gets it done instantly.
- Remove a collaborator:
gh repo remove <repository> <username>
By making these commands part of your routine, you can build a slick, efficient workflow for managing how to add collaborators in github right from the command line—the place where you likely do your most focused work anyway.
Adopting Smart Practices for Secure Collaboration
Knowing how to add a collaborator on GitHub is the easy part. The real trick, especially as your project scales, is managing that access securely. If you don't get this right from the beginning, you're setting yourself up for some major headaches—and security risks—down the road.
It all boils down to a few core practices that separate the pros from the amateurs.

Embrace the Principle of Least Privilege
This is the absolute golden rule of access control. The principle of least privilege is simple: only give people the minimum permissions they need to do their job. Nothing more. It's a foundational security concept for a reason.
Think about it in real terms. Does the marketing person reviewing your README file need push access? Of course not. They just need ‘Read’ access. A QA tester might need ‘Triage’ permissions to handle issues, but they probably shouldn't be merging branches. Save ‘Write’ access for your core development team.
My rule of thumb is to always ask, "What's the least amount of access this person needs to be effective?" Start there. It's a breeze to grant more permissions later if their role changes, but trying to claw back overly broad access after the fact is a nightmare.
Conduct Regular Access Audits
Repository access isn't a "set it and forget it" task. People change roles, contractors wrap up their projects, and team structures shift. That's why running a regular access audit is non-negotiable for a secure repository.
Set a reminder to do this quarterly or after a big project wraps up. Go through the collaborator list on your most important repos and ask a few simple questions:
- Is this person still actively contributing to this project?
- Does their permission level still match their current responsibilities?
- Are there any old, pending invites that should be revoked?
This becomes especially critical when someone leaves the company. Revoking their GitHub access should be at the top of your offboarding checklist, right alongside taking back their laptop.
Understand Collaborators vs. Outside Collaborators
If you're working within a GitHub Organization, you need to understand the difference between a member and an "outside collaborator."
An organization member is part of your core team. They're typically a full-time employee who gets access to repositories through their team membership.
An outside collaborator, on the other hand, is usually a freelancer, consultant, or agency partner. You grant them access to specific repos without making them a full member of your organization. This is the smart way to work with external folks because it walls them off from seeing your internal repositories and broader company activity.
This kind of granular, secure control is a huge reason why GitHub is the go-to platform for 100 million developers around the world, including teams at 90% of Fortune 100 companies. With tools like Dependabot now flagging vulnerabilities in over 6 million repositories, a secure collaboration setup is more important than ever. You can dig into the latest GitHub usage statistics on kinsta.com to see the full scope. Adopting these practices lets you leverage that power without exposing yourself to unnecessary risk.
Even after you get the hang of it, a few common questions always seem to surface when you're managing repository access. Let's tackle the most frequent sticking points so you can solve problems quickly and get back to building your app.
Collaborator vs. Team Member: What's the Real Difference?
This is a common point of confusion. The easiest way to think about it is scope.
A collaborator is someone you invite to a single repository. It's a direct, one-to-one permission. This is perfect for personal projects where you want a friend to help out, or when you bring in a freelancer for a specific, isolated task. You're essentially handing them a key to one room.
A team member, on the other hand, exists within a GitHub Organization. They are part of a 'team' (like "developers" or "designers"), and that team gets access to a whole set of repositories. This is the way to go for companies and larger projects because it’s scalable and much easier to manage. Instead of individual keys, you're giving a department a master keycard for their entire floor.
Help! My Collaborator Can't Push Their Code.
Ah, the classic "permission denied" puzzle. Nine times out of ten, it’s one of two things.
First, check their permission level. Head back to Settings > Manage access and make sure they have either 'Write' or 'Admin' access. If they only have 'Read' or 'Triage' permissions, they can see the code and manage issues, but they won't be able to push any changes.
The second, and more likely, culprit is protected branches. This is a fantastic security feature that you should absolutely be using for your mobile app. It prevents anyone (even you!) from pushing directly to critical branches like main or develop. The proper workflow is for your collaborator to create a new branch, push their changes to that branch, and then open a pull request.
This isn't a bug; it's a feature that enforces best practices. The pull request process ensures every line of code gets a second look before it's merged, which is non-negotiable in a professional setting.
How Do I Revoke Someone's Access?
Removing a collaborator is just as simple as adding one. Go right back to the same spot: Settings > Manage access.
You'll see a list of everyone with access to the repo. Find the user you want to remove, and you'll see a 'Remove' button right next to their name. One click, and their access is immediately revoked. It’s a clean and instant process, which is critical when a team member leaves or a contractor's project is complete.
Does Adding Collaborators Cost Anything?
For personal accounts, no! With a standard free GitHub account, you can invite an unlimited number of collaborators to your private repositories without paying a dime. This is huge for indie developers, students, and early-stage app projects.
Things are a bit different for GitHub Organizations. The free plan for organizations has its limits, and as your company grows, you'll almost certainly want to move to a paid plan like 'Team' or 'Enterprise'. These paid tiers unlock more granular controls, advanced security features, and the kind of robust team management you need to run a business.
At RapidNative, we're focused on making mobile app development faster and more accessible for everyone on the team. Our AI-powered platform turns your ideas into production-ready React Native code, bridging the gap between design and development. Build your first UI screens for free.
Ready to build your app?
Turn your idea into a production-ready React Native app in minutes.
Free tools to get you started
Free AI PRD Generator
Generate a professional product requirements document in seconds. Describe your product idea and get a complete, structured PRD instantly.
Try it freeFree AI App Name Generator
Generate unique, brandable app name ideas with AI. Get creative name suggestions with taglines, brand colors, and monogram previews.
Try it freeFree AI App Icon Generator
Generate beautiful, professional app icons with AI. Describe your app and get multiple icon variations in different styles, ready for App Store and Google Play.
Try it freeFrequently asked questions
What is RapidNative?
RapidNative is an AI-powered mobile app builder. Describe the app you want in plain English and RapidNative generates real, production-ready React Native screens you can preview, edit, and publish to the App Store or Google Play.
Can I export the code?
Yes. RapidNative generates clean React Native and Expo code that you can export at any time. No lock-in, no proprietary format. Hand it to your developers or keep building inside RapidNative.
Is RapidNative free to use?
Yes. You can build apps on the free plan with no credit card required. Paid plans unlock unlimited AI generations, code export, and direct publishing to the App Store and Google Play.
Do I need to know how to code?
No. Most users build apps by describing what they want in plain English. Developers can drop into the code whenever they want more control, but coding is optional.
How long does it take to build an app?
Most users have a working first screen in under a minute. A full MVP usually takes a few hours instead of the weeks or months traditional development requires.