A Product Manager's Guide to Mobile Prototyping
A practical guide to mobile prototyping for product managers. Learn to validate ideas, gather real user feedback, and accelerate your development workflow.
By Rishav
20th Nov 2025
Last updated: 17th Feb 2026
As a product manager, you know the drill. The pressure is on to launch mobile apps that don't just work, but win. You’re juggling stakeholder expectations, deciphering market needs, and trying to guide your engineering team toward a finish line that sometimes feels like it's moving. This is where rapid mobile prototyping becomes your secret weapon.
We're not talking about the old, sluggish process that took weeks and kept you siloed from the real action. Modern, chat-driven workflows are flipping the script, cutting down timelines from weeks to just a few days. This lets you de-risk development and get real feedback from users before a developer ever touches the code.
Why Prototyping Is A PM's Secret Weapon
Let's be honest: translating a vision into a product everyone understands is one of the hardest parts of the job. You can write the most detailed product requirements document (PRD) in history, but nothing gets the point across like a working prototype.
It’s about making your idea real. When you hand stakeholders a phone with an interactive prototype, you've moved past "telling" them your vision and into "showing" them. That simple shift changes the entire dynamic of a feedback session and helps you build genuine consensus, fast.
Beyond Static Designs
A clickable prototype is where the rubber meets the road. It forces you to confront the entire user journey, from the moment they open the app to the final confirmation screen. You'll immediately spot awkward transitions and logical gaps that a static Figma file or a PowerPoint deck would never reveal. Catching these issues early saves an incredible amount of engineering rework down the line.
This hands-on approach is fundamental to building things people actually want to use. Prototyping is a core pillar of agile thinking, and if you want to get better at shipping MVPs that drive growth, you need to master iterative development models. The data backs this up, too. Companies that build and test MVPs have a 62% higher success rate than those that jump straight into full-scale development.
To see how much the game has changed, let's compare the old way of doing things with a modern, AI-assisted approach.
Traditional vs Modern Prototyping Workflow
| Phase | Traditional Approach (Weeks) | Modern Chat-Driven Approach (Days) |
|---|---|---|
| Idea & Scoping | 1-2 weeks of docs and meetings | 1-2 days of focused goal definition |
| Wireframing | 1 week with a designer | 1-2 hours via chat prompts |
| High-Fidelity Mockups | 2-3 weeks of design cycles | 1-2 days with chat-driven iteration |
| Interactive Prototype | 1 week with tools like Figma/InVision | ~30 minutes to test on a real device |
| Developer Handoff | 1 week of spec docs and asset prep | Instant export of production-ready code |
| Total Time | 6-8 Weeks | < 1 Week |
The difference is stark. What used to take a whole quarter can now be accomplished before the week is out, freeing up your team to focus on what matters most: building a validated, successful product.
Core Benefits Of Modern Prototyping
For a product manager, the advantages here directly solve some of the biggest headaches in the development lifecycle. A prototype-first mindset allows you to:
- De-Risk Major Investments: You get to validate your riskiest assumptions with minimal time and money. This ensures your engineering team's valuable time is spent building something you already know has legs.
- Secure Stakeholder Alignment: A tangible prototype is the ultimate communication tool. It ends debates and gets everyone—from the CEO to the marketing lead—excited and on the same page.
- Gather Authentic User Feedback: There’s no substitute for watching someone use your app on their own phone. You get raw, unfiltered insights into what’s working and what’s frustrating.
- Accelerate Development Handoff: Instead of handing developers a picture and a prayer, modern tools can export clean, production-ready code. This gives them a massive head start.
By turning your abstract ideas into something users can actually touch and feel, you get concrete feedback instead of just opinions. It’s the fastest path to learning what your customers truly want and the surest way to build a product that resonates.
Pinpoint Your Prototype's Core Purpose
Before you build anything, the absolute first step is to decide what you're trying to prove. This is where so many projects go off the rails. Without a clear mission, you'll end up with a prototype that pulls you in a dozen different directions, and the feedback you get will be just as scattered. Forget "let's build a new feature" for a moment. We need to get specific.
The entire point is to land on a sharp, testable hypothesis. This isn't just an academic exercise; it's a practical, guiding statement for everything that comes next. A solid hypothesis directly links a specific feature to a business outcome you can actually measure.
From Vague Idea to Testable Hypothesis
Let's look at a real-world example. A weak goal is something like, "Improve the checkout experience." What does that even mean? A strong hypothesis, on the other hand, sounds like this: "If we simplify our checkout flow to three screens, we can boost mobile conversion rates by 15%." See the difference? Suddenly, your prototype has a mission and a clear definition of success.
Here are a few more examples from the field:
- Weak Idea: "Make onboarding better."
- Strong Hypothesis: "If we introduce a three-step interactive tutorial during onboarding, we can increase Day 1 user retention by 20%."
- Weak Idea: "Add a social sharing feature."
- Strong Hypothesis: "If we add a 'Share to Instagram Stories' button on the order confirmation screen, we can drive a 5% increase in user-generated content."
Taking the time to do this forces you to be ruthless about what matters. You aren't building the whole app. You're building just enough to prove (or disprove) that one big assumption. It’s the best defense against trying to boil the ocean and testing way too many things at once.
Map the Critical User Journey
Once you’ve nailed your hypothesis, you can map out the one user journey needed to test it. For that checkout hypothesis, you don't need the home screen, the settings, or the user profile. You just need the path a user takes from adding an item to their cart all the way through to seeing that "Thank You" confirmation.
Your prototype’s job is to answer one question well, not every possible question. By focusing on a single, critical path, you create a controlled experiment that delivers clean, actionable insights.
Sketch this journey out as a simple sequence. For our example, it might be:
- Shopping Cart Screen: User reviews items and hits "Proceed to Checkout."
- Shipping Details Screen: User enters or confirms their address.
- Payment & Confirmation Screen: User adds payment details and finalizes the purchase.
This simple map is now the blueprint for your prototype. Each of those steps becomes a clear prompt for a chat-based tool, which is exactly how you start moving fast and getting the answers you need. If you're looking at different tools, we've broken down some great options in our guide to product management prototyping tools.
Bringing Your Prototype to Life with Chat
This is where the magic happens. Your user flow, which up until now has just been a map, is about to become a real, interactive experience you can hold in your hand. Using a chat-based tool means you don't need a design background or have to wrestle with complicated software. You just need your words. Think of it as directing the construction of your app, one prompt at a time.
The whole process feels less like "designing" and more like a conversation. You bring the vision for the user journey, and the AI handles the heavy lifting of building the screens. This frees you up to focus purely on what matters most: the user experience.
Writing Your First Prompts
The secret to good chat-based prototyping is writing clear, specific instructions. Your prompts need to describe exactly what you want the user to see and do on each screen. You're not coding; you’re just explaining your vision in plain English.
Let's stick with our checkout flow example. To build that initial screen, a good prompt would be something like this:
"Create a 'Shopping Cart' screen for an e-commerce app. It needs a list of items showing a small product image, name, quantity, and price. At the bottom, show a subtotal, shipping cost, and a bold total. Finish with a primary button that says 'Proceed to Checkout'."
That one sentence gives the AI all the information it needs to generate a solid, well-structured screen. You’ve effectively translated a step in your user flow directly into a build command.
This simple, linear process—from idea to a buildable prompt—is what makes this so fast and effective.
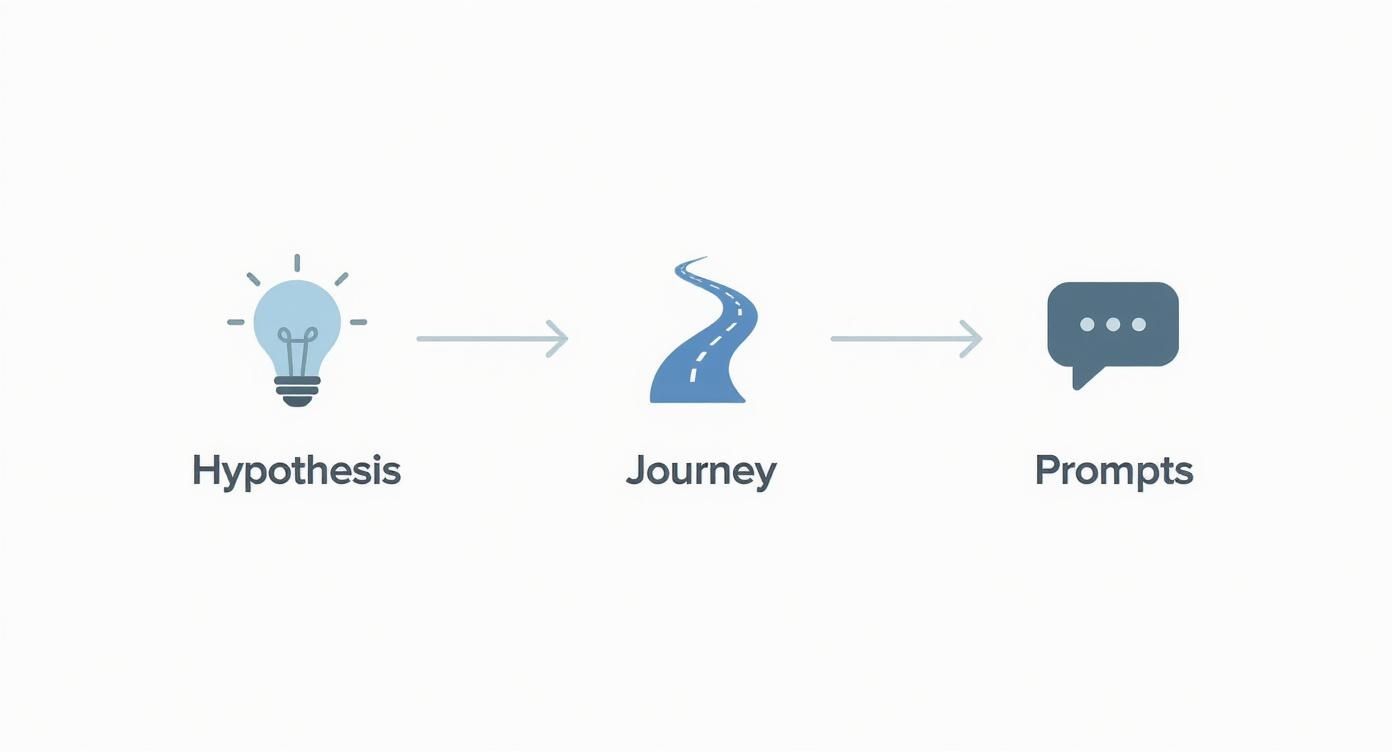
As the visual shows, a clear hypothesis and user journey are the foundation. They ensure every prompt you write serves the core purpose you set out to validate.
Iterating on the Fly with Conversational Edits
Let's be real: the first draft is never the final one. This is where chat-driven prototyping really pulls ahead. Instead of writing up feedback, sending it to a designer, and waiting for a new version, you can make changes instantly with simple follow-up commands. That immediate feedback loop is incredibly powerful.
Maybe the first version of the cart screen is okay, but the branding feels off. No problem. You can refine it with quick prompts like:
- "Change the primary button color to our brand's blue, hex code #0052FF."
- "Make the font size of the total price larger so it stands out more."
- "Add a 'Remove' icon next to each item in the cart."
- "Put a back arrow icon in the top left of the navigation bar."
Each of these is a small, surgical tweak that nudges the prototype closer to your final vision. This approach makes UI/UX changes feel less like a formal process and more like an exploratory conversation. If you want to see just how much is possible, it's worth learning more about the capabilities of a modern mobile prototype builder.
Tying It All Together into a Cohesive Flow
A collection of screens is one thing, but a prototype only becomes valuable when it tells a story. The final piece of the puzzle is linking your screens to mimic the actual user journey. And just like everything else, this is done with simple, intuitive prompts.
Once your "Shopping Cart" and "Shipping Details" screens are ready, you just have to tell the tool how they connect:
"When the user taps the 'Proceed to Checkout' button on the cart screen, navigate them to the 'Shipping Details' screen."
And that’s it. In just a few prompts, you haven't just built individual screens; you've wired them together into a logical sequence. The result is a high-fidelity prototype that looks and feels like a native app, accurately representing the core experience you need to test—all built just by describing what you wanted.
Getting Real Feedback with On-Device Testing
A prototype is just a picture on a screen until someone actually holds it in their hands. This is where your mobile prototyping work really starts to pay off, transforming from a cool idea into something someone can actually feel and interact with. The whole point is to get that interactive build into the hands of stakeholders and real users—fast.
Thankfully, modern tools make this part pretty painless. You can usually generate a public link or a QR code that lets anyone open the prototype directly on their phone. This gives them an immediate sense of the app's native performance and how the interactions truly feel, which is something a web-based mockup just can't replicate.
This ease of access is a huge advantage for product managers. It's one of the reasons low-code development is exploding into what's expected to be a $264.4 billion market by 2032. With AI-powered app revenue also surging, the ability to test and validate ideas quickly is more critical than ever. Discover more insights about these app development statistics.
Running a Quick Usability Test
Once your prototype is on a device, it's time to watch someone use it. You don't need a fancy lab for this. A quick "guerrilla" test over coffee can expose massive usability problems that you'd never catch with static designs. Your job isn't to be a tour guide; it's to be a quiet observer, taking in their raw, unfiltered reactions.
Just give them a simple task and see what happens. What you see will tell you far more than what they say. If you want to get more structured with your approach, it’s worth exploring these essential user experience testing methods.
Remember, it's not just about collecting one-off reactions. The entire lifecycle of user feedback—from how you gather it to how you analyze it—is the engine for product growth. Thinking about it as a continuous loop is key, a concept you can explore further when unlocking growth with effective user feedback.
What to Ask and Observe
To get genuine insights, stick with open-ended tasks and questions. Here’s a quick checklist to get you going:
- Task-Based Prompt: "Show me how you would buy this item." This lets you see exactly where they tap, hesitate, or get lost.
- Expectation vs. Reality: "What did you expect to happen when you tapped that button?" This is perfect for uncovering mismatches between your UI and the user's assumptions.
- Findability Test: "Where would you look to find your order history?" This is a simple, effective test of your navigation and overall information architecture.
- Value Proposition Check: "After playing with this for a minute, what do you think this app is for?" A fantastic way to check if your core value is actually landing.
The most valuable feedback comes from silent observation. Watch for the moments where a user pauses, squints, or taps in the wrong place. Those non-verbal cues are gold—they pinpoint exactly where your design is creating friction.
Bridging the Gap: Your Seamless Handoff to Developers
You've got a validated prototype. That's a huge win, but its most important job is still ahead: bridging the gap between your vision and the engineering team that will bring it to life. We’ve all been there—the classic handoff involves tossing over a folder of static screens and a massive requirements doc. It’s a process notoriously riddled with friction and guesswork.

This is where a modern approach to mobile prototyping really flips the script. Instead of giving developers a picture and asking them to recreate it from scratch, you’re giving them an actual starting point. With a tool like RapidNative, you can export clean, production-ready code straight from the prototype you just tested.
That single action transforms the prototype from a static reference into a genuine development accelerator. Think of all the back-and-forth it eliminates. The subtle animations, the precise layout, the interaction nuances—they’re all baked right into the code.
From Prototype to Production Code
Imagine handing your engineering team a codebase for the exact user flow you just got feedback on. Right away, they can see how components are structured, how the navigation works, and what the core UI elements look like. This isn't just a mock-up; it's a massive head start in a framework like SwiftUI or Kotlin.
This fundamentally changes the conversation. It goes from, "So, what is this screen supposed to do when I tap here?" to "Okay, let's figure out the best way to integrate this into our existing architecture." It's a more collaborative, efficient, and honestly, a much faster way to build great products.
By exporting code directly, you're not just handing off a design; you're handing off momentum. You cut out ambiguity at the most critical stage, dramatically reducing the risk of costly rework and ensuring the final product actually feels like the one you validated.
The Essential Developer Handoff Checklist
Of course, a great handoff is more than just a code drop. It’s about providing the full context. Your real goal is to arm your developers with everything they need to build with absolute confidence and clarity.
Before you call it done, run through this quick checklist.
- Exported Codebase: The complete source code for the prototype. This is the foundation they’ll build on.
- Final User Flow Diagram: The visual map of the journey you tested. It gives everyone that high-level view of how all the pieces connect.
- Key User Testing Insights: A quick summary of your most important findings. What delighted users? Where did they get stuck? This context is gold for making smart implementation choices.
- Access to the Live Prototype: A direct link to the interactive prototype. This lets them click through the experience exactly as a user would, which can fill in gaps the code alone might not convey.
Answering the Tough Prototyping Questions
Whenever I talk to product managers about shifting to a faster, more hands-on prototyping workflow, the same practical questions always come up. It's one thing to see the potential, but it's another to actually integrate it into your team's rhythm. Let's tackle the most common hurdles you'll face.
"How Real Does This Thing Need to Be?"
The answer is always: as real as it needs to be to achieve your goal. Fidelity isn't one-size-fits-all.
If you're just trying to get your internal team on the same page about a basic user journey, a simple wireframe or a low-fidelity mockup is often enough. It’s a conversation starter, not a finished product.
But if you're putting a prototype in front of actual users to test the experience? It needs to feel 100% native. We're talking realistic interactions, smooth animations, and transitions that feel like they belong on an iPhone or Android device. This is the only way you’ll get genuine, gut-level feedback on usability before a single line of production code is written.
"Can I Hook This Up to Our Live APIs?"
I get why this question comes up, but for rapid prototyping, it’s usually a distraction. The whole point is to validate the user flow and the interface fast, without getting bogged down in backend logic.
Think of it this way: your immediate goal is to confirm the user experience. Using mock data is the most efficient path there. It keeps everyone laser-focused on what the user sees and feels.
Once you’ve nailed the front-end flow and have the user-tested blueprint in hand, your developers can then connect it to the real APIs and databases. This approach—validating the UX first, then building the backend—is a cornerstone of an efficient product development cycle.
"How Do I Sell This 'Extra Step' to My Boss?"
This is probably the biggest hurdle for most PMs. The key is to completely reframe the conversation. Prototyping isn't an "extra step"—it's an essential risk-reduction strategy.
You have to show stakeholders that a prototype built in a few hours or days can save the company from months of wasted engineering time building the wrong thing. When you put it that way, the math becomes pretty compelling.
Here’s how I break it down for them:
- It saves a ton of money. Iterating on a prototype is practically free compared to the cost of refactoring a live, complex codebase.
- It gets us to market faster. By validating our assumptions upfront, we ensure engineering resources are spent on features we know customers will actually use.
- It’s incredibly persuasive. Nothing gets executive buy-in faster than handing them a phone with an interactive prototype. It’s infinitely more powerful than a slide deck filled with static mockups.
You aren't asking for more time. You're asking for the time to make sure the product actually succeeds. Making this case builds trust and positions you as a strategic leader, not just a feature manager.
Ready to turn your ideas into interactive, native prototypes in minutes? RapidNative bridges the gap between your vision and a functional app by turning plain-English prompts into production-ready React Native code. Validate your flows, get real user feedback, and accelerate your development handoff. Try RapidNative today.
Ready to build your app?
Turn your idea into a production-ready React Native app in minutes.
Free tools to get you started
Free AI PRD Generator
Generate a professional product requirements document in seconds. Describe your product idea and get a complete, structured PRD instantly.
Try it freeFree AI App Name Generator
Generate unique, brandable app name ideas with AI. Get creative name suggestions with taglines, brand colors, and monogram previews.
Try it freeFree AI App Icon Generator
Generate beautiful, professional app icons with AI. Describe your app and get multiple icon variations in different styles, ready for App Store and Google Play.
Try it freeFrequently asked questions
What is RapidNative?
RapidNative is an AI-powered mobile app builder. Describe the app you want in plain English and RapidNative generates real, production-ready React Native screens you can preview, edit, and publish to the App Store or Google Play.
Can I export the code?
Yes. RapidNative generates clean React Native and Expo code that you can export at any time. No lock-in, no proprietary format. Hand it to your developers or keep building inside RapidNative.
Is RapidNative free to use?
Yes. You can build apps on the free plan with no credit card required. Paid plans unlock unlimited AI generations, code export, and direct publishing to the App Store and Google Play.
Do I need to know how to code?
No. Most users build apps by describing what they want in plain English. Developers can drop into the code whenever they want more control, but coding is optional.
How long does it take to build an app?
Most users have a working first screen in under a minute. A full MVP usually takes a few hours instead of the weeks or months traditional development requires.