A Practical Guide to React Native Push Notifications with Expo
Learn to implement React Native push notifications with Expo. This guide covers setup, token handling, and best practices for boosting user engagement.
By Rishav
18th Jan 2026
Last updated: 18th Jan 2026
Setting up react native push notifications isn't just a technical task; it’s about opening a direct line of communication to your users. When done right, push notifications turn your app from a passive tool into an active partner in your user's day, driving engagement and keeping them coming back.
Why Push Notifications Are a Growth Engine for Your App
Before jumping into code, it's crucial for the entire team—founders, product managers, and developers—to understand why push notifications are so critical for growth. Think of them as your app's most direct and personal channel, capable of shaping user behavior and hitting key business goals.

From Simple Alerts to Driving Action
The real value of a push notification is its power to deliver timely, relevant information that gets the user to do something. This simple ability transforms a basic alert into a meaningful interaction.
Consider these real-world use cases:
- E-commerce: An abandoned cart reminder like, "Still thinking it over? Your items are waiting," can recover a significant amount of lost sales.
- Fitness: A motivational nudge—"You're just one workout away from your weekly goal!"—can be the push someone needs to stay on track.
- Social Media: Notifying a user that a friend commented on their post pulls them right back into the app, boosting daily active users.
A great notification feels less like an interruption and more like a helpful assistant. It anticipates what a user needs and offers real value at the perfect moment.
The data supports this. One analysis found that users who receive even a single notification have 120% higher retention than users who receive none. This figure jumps to a staggering 820% increase for users who receive daily notifications, proving just how profound the impact can be.
Creating a Direct Channel to Your Users
Ultimately, a smart notification strategy builds a direct relationship with your audience, cutting through the noise of crowded email inboxes. The trick is making sure your message is always welcome and valuable.
This principle extends beyond just app notifications. You can see how other platforms drive growth by building automated sales funnels with messaging apps. Every notification is a chance to strengthen the user relationship, which is why thoughtful planning and rigorous user experience testing methods are non-negotiable before writing a single line of code.
Setting Up Your Foundation with Expo
To implement push notifications efficiently in React Native, you need a solid foundation. For teams focused on speed and cross-platform consistency, the expo-notifications library is the clear choice. It handles the complex, platform-specific details, letting you focus on creating a great user experience instead of wrestling with native code.

This approach, known as the Expo managed workflow, manages the tricky connections to Apple Push Notification service (APNs) and Firebase Cloud Messaging (FCM) behind the scenes. It's a massive time-saver, particularly for product managers and founders who want to see features in users' hands quickly.
Choosing Your Path: Expo vs. Native
The choice between a managed service like Expo and a manual native setup comes down to a trade-off. A "bare" React Native project offers granular control but demands far more setup time and deep expertise in both iOS and Android ecosystems.
For most teams, the benefits of the Expo managed workflow are a clear winner. Here’s a quick breakdown of why.
Expo Notifications vs Native FCM/APNs Setup
This side-by-side comparison highlights the difference in effort.
| Feature | Expo Notifications | Native FCM/APNs |
|---|---|---|
| Setup Speed | Extremely fast. Install one library and add a few lines to app.json. | Much slower. Requires manual setup in Xcode and Android Studio, plus native code changes. |
| Maintenance | Simple. Expo handles updates to the underlying native push SDKs for you. | Complex. You're responsible for updating native dependencies and handling breaking changes. |
| Cross-Platform API | Unified. A single JavaScript/TypeScript API works for both iOS and Android. | Separate. You'll end up writing platform-specific code or juggling multiple libraries. |
| Customization | Excellent for most use cases, but can be limited for deep OS-level features. | Full control. This is where it shines if you need advanced, platform-specific customizations. |
In short, expo-notifications gets you 95% of the way to a fantastic user experience with a fraction of the effort. It’s the pragmatic choice for teams that prioritize speed and maintainability.
Kicking Off Your Implementation
Let's get started. The first step is to add the expo-notifications library to your project. If you're starting from scratch, our guide on how to create an Expo app will help you set up a clean project.
Once your project is ready, open your terminal and run this command:
npx expo install expo-notifications
This command not only adds the package but also links any necessary native dependencies, helping you avoid frustrating version mismatch errors.
Next, you need to configure how your app handles incoming notifications when it's not in the foreground. You do this by adding a plugins entry to your app.json or app.config.js file.
{
  "expo": {
    "plugins": [
      [
        "expo-notifications",
        {
          "icon": "./assets/notification-icon.png",
          "color": "#ffffff"
        }
      ]
    ]
  }
}
This simple configuration ensures your app uses a custom icon and color on Android, keeping your branding consistent.
Configuring for Android with Firebase
Android delivers notifications through Firebase Cloud Messaging (FCM). While Expo handles the integration, you still need to set up a Firebase project.
Here’s a quick checklist:
- Create a Firebase Project: Go to the Firebase console, start a new project, and add an Android app.
- Match Your Package Name: When prompted, enter your app’s package name. This must match the
packagename defined in yourapp.jsonunder theandroidkey. If they don't match, notifications will fail silently. - Get Your Config File: Firebase will generate a
google-services.jsonfile. Download it and place it in the root directory of your Expo project. - Link the File: Finally, tell Expo where to find the file by adding this line to your
app.json:
{
  "expo": {
    "android": {
      "googleServicesFile": "./google-services.json"
    }
  }
}
With that, Expo's build service will automatically wire up the Firebase SDK for you when you build your Android app. No manual integration required.
Key Takeaway: Think of
google-services.jsonas the secure key that connects your app to your Firebase project. If it's missing or misconfigured, your Android users won't get any notifications.
This foundational setup is the most technical part of the process. Now you can move on to the user-facing work of handling permissions and managing tokens.
Getting Permission and Managing User Tokens
With your project configured, we've reached the most critical step: getting the user's permission to send them notifications. This isn't just a technical requirement; it's a crucial interaction. How and when you ask can mean the difference between an engaged user and one who disables notifications forever.
A generic permission pop-up on the first app launch is a surefire way to get a "No." The user hasn't experienced the value of your app yet, so why would they agree?
Ask for Permission at the Right Moment
The best strategy is to ask for permission contextually, right after a user has a positive experience. For example, after they place their first order, you could prompt them with something like, "Want to get updates when your order ships?" This ties the request to a clear, immediate benefit.
This thoughtful timing is a hallmark of great React Native app development because it respects the user's journey. Before you ask, however, always check the current permission status. They may have already granted permission, or they may have denied it. Don't annoy them by asking again if they've already decided.
Getting the Expo Push Token
Once the user gives you the green light, you can retrieve their unique Expo Push Token. Think of this token as a specific mailing address for that user's device. It's a long, unique string that tells Expo's servers exactly where to send a notification.
Without this token, you can't send targeted pushes. It’s vital to fetch it and store it securely on your backend, tying it to that specific user's account.
Here's a battle-tested TypeScript function that handles this entire process gracefully:
import * as Notifications from 'expo-notifications';
import { Platform } from 'react-native';

async function registerForPushNotificationsAsync(): Promise<string | undefined> {
  let token;

  if (Platform.OS === 'android') {
    await Notifications.setNotificationChannelAsync('default', {
      name: 'default',
      importance: Notifications.AndroidImportance.MAX,
      vibrationPattern: [0, 250, 250, 250],
      lightColor: '#FF231F7C',
    });
  }

  const { status: existingStatus } = await Notifications.getPermissionsAsync();
  let finalStatus = existingStatus;

  if (existingStatus !== 'granted') {
    const { status } = await Notifications.requestPermissionsAsync();
    finalStatus = status;
  }

  if (finalStatus !== 'granted') {
    // Handle the case where the user denies permission
    alert('Failed to get push token for push notification!');
    return;
  }

  // This is the crucial step to get the token
  token = (await Notifications.getExpoPushTokenAsync()).data;
  console.log(token);

  return token;
}
This function first checks the existing permission status. If permission hasn't been granted, it then asks. Only after receiving a "granted" status does it fetch the token.
Storing Tokens and Managing Users
Once you have the Expo Push Token, the final piece is to send it to your backend server. You'll need an API endpoint that can receive this token and associate it with a specific user's account in your database.
This link is what enables personalization. By knowing which token belongs to which user, you can send notifications based on their specific actions, preferences, or order history.
Key Takeaway: The user token is the bridge between your server and a specific device. Securely storing and mapping these tokens to user profiles is what enables relevant, personalized notifications instead of generic, annoying broadcasts.
Nailing the right frequency and relevance is everything. Overdo it, and users will opt out. Some data shows that 46% of users will disable notifications for an app if they get just two to five pushes per week. You can find more insights on this by reading this comprehensive React Native push notifications guide on f22labs.com.
With the token stored safely on your server, you're ready to handle incoming notifications on the device.
Handling Incoming Notifications in Your App
You’ve received permission and stored the user's push token. Now for the fun part: making your notifications actually do something useful.
A notification that a user can't interact with is a missed opportunity. The magic happens when a user taps it and your app responds intelligently. Your client-side code needs to be ready for this, whether your app is active in the foreground, running in the background, or completely closed.
The expo-notifications library provides powerful "listeners" to watch for notification events and trigger specific actions, turning simple alerts into interactive pathways.
This all depends on the initial permission flow: you must check for permission, ask for it if needed, and then get the token.
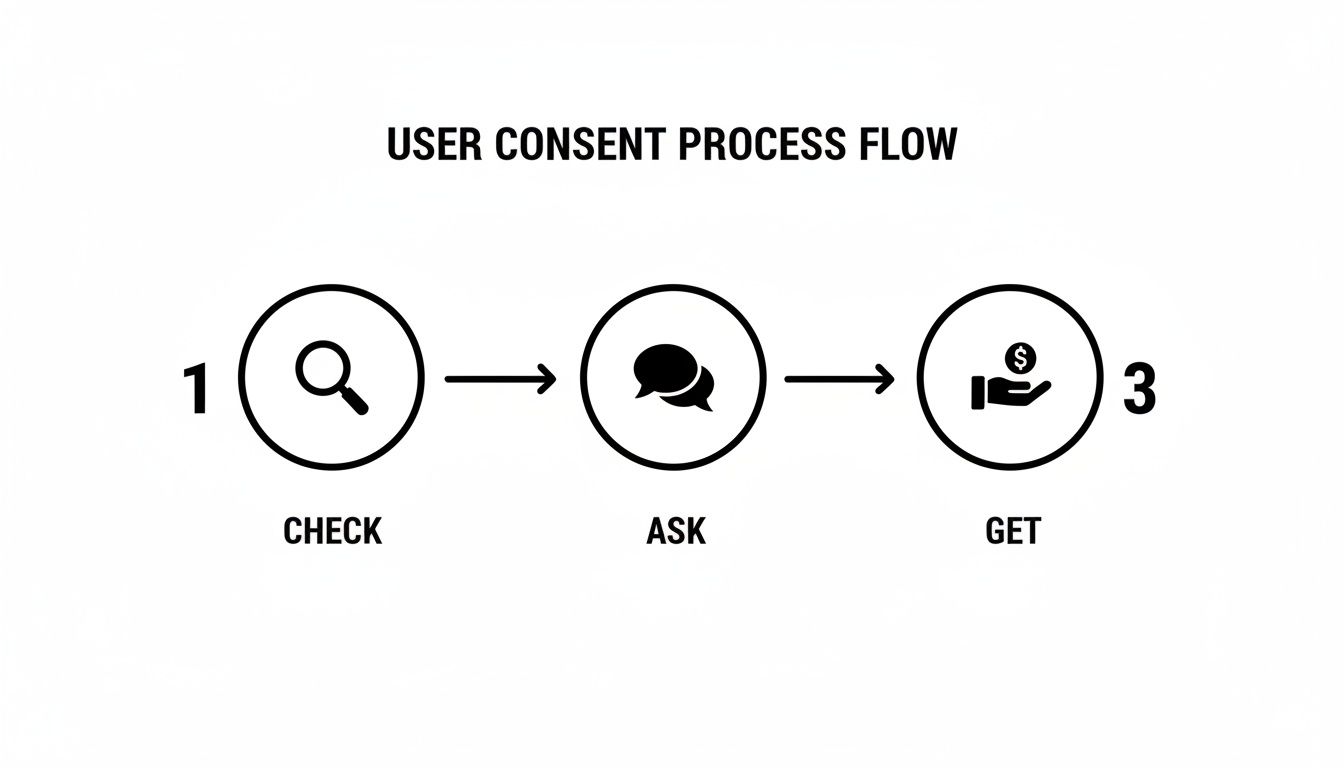
Nailing this consent process is the gateway to building a truly responsive notification system.
What to Do When a Notification Arrives in the Foreground
What happens if a notification arrives while the user is actively using your app? By default, both iOS and Android will do nothing. The operating system assumes a pop-up would be disruptive and quietly suppresses it.
But sometimes, that's not what you want. In a messaging app, for example, you'd want an in-app banner to appear. You can override the default behavior by setting up a notification handler at the root of your app.
This code tells your app how to behave when a notification is received while it’s in the foreground.
import * as Notifications from 'expo-notifications';

// Set this at the top level of your app, like in App.tsx
Notifications.setNotificationHandler({
  handleNotification: async () => ({
    shouldShowAlert: true, // Display the banner
    shouldPlaySound: true, // Play a sound
    shouldSetBadge: false, // Don't change the app icon's badge count
  }),
});
With this handler in place, your notifications will now appear even when the app is open.
Responding When a User Taps a Notification
This is the most important interaction. When a user taps your notification, you have a golden opportunity to take them directly to the relevant content. Simply opening the app to the home screen is a missed opportunity. A tap that takes them straight to a new message, a specific order update, or a featured product creates a great user experience.
This is where deep linking comes in. By using listeners with a navigation library like react-navigation, you can read data sent with the notification and take the user exactly where they need to go.
You'll set up two main listeners:
addNotificationReceivedListener: Fires the moment a notification is received.addNotificationResponseReceivedListener: Fires only when a user taps or interacts with the notification. This is the one we'll use for navigation.
Here’s a practical example of how to use the response listener to navigate a user after a tap.
import { useEffect } from 'react';
import * as Notifications from 'expo-notifications';
import { useNavigation } from '@react-navigation/native';

export const useNotificationObserver = () => {
  const navigation = useNavigation();

  useEffect(() => {
    // This listener fires when a user taps on a notification
    const responseSubscription = Notifications.addNotificationResponseReceivedListener(response => {
      const { screen, id } = response.notification.request.content.data;

      // If the notification payload has the right data, navigate!
      if (screen && id) {
        navigation.navigate(screen, { itemId: id });
      }
    });

    // Clean up the listener when the component unmounts
    return () => {
      responseSubscription.remove();
    };
  }, [navigation]);
};
This code assumes your server sent a notification with a data payload like { "screen": "ProductDetail", "id": "123" }. The listener grabs that data and uses react-navigation to take the user to the ProductDetail screen for the item with an ID of 123.
My Key Takeaway: The
datapayload is your secret weapon for react native push notifications. It's an invisible container you can fill with context—like screen names or item IDs—that your app can use to react intelligently when the notification is tapped.
You can call this custom hook from your root navigator component to ensure it's always listening for user interactions. By connecting data from your push notifications directly to your app's navigation, you create a seamless and valuable experience.
Sending Notifications and Advanced Strategies
With your app ready to handle permissions and taps, it's time to send a notification from your server. While this guide won't cover building a full backend, understanding the server-side workflow is essential.
This is where managing user tokens pays off. Each token stored in your database is a direct line to a user's device, enabling you to move beyond generic broadcasts and deliver personal, relevant notifications.
Test Your First Server Push
Before writing backend code, you should test your setup using the Expo Push Notification Tool. This web utility lets you debug your app’s listeners and navigation logic without a server.
Simply get an Expo Push Token from your test device (you can console.log it for easy access), paste it into the tool, and compose your message. You can even add a JSON data payload to mimic what your server will do, which is perfect for testing deep-linking.
A Look at a Server-Side Push Request
When you're ready to integrate this into your backend, the process is straightforward. Your server just needs to make a POST request to Expo’s push notification endpoint. The body of the request will contain the recipient's token, your message, and any custom data.
Here’s a minimal Node.js example using fetch:
async function sendPushNotification(expoPushToken, title, body, data) {
  const message = {
    to: expoPushToken,
    sound: 'default',
    title: title,
    body: body,
    data: data, // e.g., { "screen": "ProductDetail", "id": "123" }
  };

  await fetch('https://exp.host/--/api/v2/push/send', {
    method: 'POST',
    headers: {
      Accept: 'application/json',
      'Accept-encoding': 'gzip, deflate',
      'Content-Type': 'application/json',
    },
    body: JSON.stringify(message),
  });
}
This function sends the notification content to Expo. From there, Expo handles the delivery to Apple's APNs or Google's FCM.
Crafting Rich and Engaging Notifications
A simple text alert is just the beginning. The real power of react native push notifications lies in creating rich, interactive experiences. A plain line of text is easy to ignore; a notification with a compelling image is much harder to dismiss.
The data confirms this. A study of over 50 billion notifications found that adding emojis can increase reaction rates by 20%, while rich media like images boosts click rates by 25%. On average, rich pushes see 56% higher open rates than plain-text notifications. You can dig into more data in this in-depth guide from Courier.
A great push notification shouldn’t just inform; it should entice. It’s a micro-interaction that begins outside your app and seamlessly pulls the user back in.
Advanced Strategies to Boost Engagement
Once you’ve mastered the basics, you can layer in more sophisticated techniques:
- Personalization: Go beyond using a first name. Reference a user's recent activity. A message like, "Hey, the sneakers you were looking at are back in stock!" is far more effective than a generic "Sale happening now!"
- A/B Testing: Don't guess what works. Test your copy, calls to action, and send times. Does a casual tone outperform a formal one? Let data drive your strategy.
- Segmentation: Group users based on their behavior. Send an exclusive offer to power users, a gentle re-engagement campaign to dormant users, or location-based updates to users in a specific city.
By combining a solid technical setup with these user-focused strategies, you can transform your notifications into a powerful engine for growth and retention.
Common Questions and Troubleshooting
Even with a great framework like Expo, you'll likely encounter some issues when setting up React Native push notifications. Here are some of the most common problems and how to solve them.
Why Are My Notifications Not Working on a Real Android Device?
This is a classic problem: notifications work in the simulator but not on a physical Android device. This almost always points to a mismatch in your Firebase setup.
First, ensure the google-services.json file from your Firebase project is in the root of your app's directory. Then, open app.json and double-check that the android.googleServicesFile key points to it correctly.
Most importantly, the android.package name in app.json must be an exact match for the package name you registered in your Firebase project. Any small difference will cause the connection to fail silently.
Also, be aware of aggressive battery optimization on phones from manufacturers like Xiaomi or OnePlus. These systems can kill background services, preventing your app from receiving notifications. Check the app's battery settings on the device if you suspect this is the issue.
How Can I Test Push Notifications Without a Backend?
You don't need a live server to test your app's notification logic. The Expo Push Notification Tool is a lifesaver for this. It’s a web-based tool that lets you send notifications directly to your device from your browser.
The process is simple:
- Run your app on a physical device.
- Log the Expo Push Token your app generates to the console and copy it.
- Go to the tool's website and paste in the token.
- Write your message, add any JSON data, and click send.
This is the perfect way to debug your deep-linking logic or test your UI with different notification payloads before your backend is ready.
Quick Tip: A remote notification comes from a server (like a new message), while a local notification is scheduled by the app itself (like a calendar reminder). The
expo-notificationslibrary handles both, but it's important to know which one you're working with.
Can I Customize the Notification Icon and Sound on Android?
Yes, and you should for better branding. To change the small icon in the Android status bar, add the android.notification.icon key in your app.json and point it to a local image file. It's best to use a single-color PNG with a transparent background.
Custom sounds require a bit more effort. You'll need to include the sound file in your app's assets and set up an Android Notification Channel. This channel allows you to group notifications and apply custom settings like sounds or vibration patterns, which you can then specify from your server in the notification payload.
Ready to build your app's UI faster than ever? RapidNative is an AI-powered builder that turns your ideas into production-ready React Native code. Stop wrestling with boilerplate and start shipping. Try RapidNative today and bring your mobile app to life.
Ready to build your app?
Turn your idea into a production-ready React Native app in minutes.
Free tools to get you started
Free AI PRD Generator
Generate a professional product requirements document in seconds. Describe your product idea and get a complete, structured PRD instantly.
Try it freeFree AI App Name Generator
Generate unique, brandable app name ideas with AI. Get creative name suggestions with taglines, brand colors, and monogram previews.
Try it freeFree AI App Icon Generator
Generate beautiful, professional app icons with AI. Describe your app and get multiple icon variations in different styles, ready for App Store and Google Play.
Try it freeFrequently asked questions
What is RapidNative?
RapidNative is an AI-powered mobile app builder. Describe the app you want in plain English and RapidNative generates real, production-ready React Native screens you can preview, edit, and publish to the App Store or Google Play.
Can I export the code?
Yes. RapidNative generates clean React Native and Expo code that you can export at any time. No lock-in, no proprietary format. Hand it to your developers or keep building inside RapidNative.
Is RapidNative free to use?
Yes. You can build apps on the free plan with no credit card required. Paid plans unlock unlimited AI generations, code export, and direct publishing to the App Store and Google Play.
Do I need to know how to code?
No. Most users build apps by describing what they want in plain English. Developers can drop into the code whenever they want more control, but coding is optional.
How long does it take to build an app?
Most users have a working first screen in under a minute. A full MVP usually takes a few hours instead of the weeks or months traditional development requires.