How an AI React Native Generator Can Build Your App's UI for You
Transform your ideas into real code. This guide shows you how to use an AI React Native generator to build, refine, and ship mobile apps faster than ever.
By Rishav
20th Dec 2025
Last updated: 20th Dec 2025
An AI React Native generator is a tool that turns your ideas—whether they're simple text prompts, wireframes, or even Figma designs—into functional, ready-to-use mobile app screens. Think of it as a super-smart assistant that handles the tedious work of writing clean UI code, dramatically cutting down the time it takes to get from a concept to a working prototype.
How AI Is Reshaping How Product Teams Build Apps
For years, building a mobile app followed a slow, linear process. A designer would create mockups, hand them off to a developer, and then wait as every single screen, button, and input field was painstakingly coded by hand. This created a huge bottleneck, slowing down anyone trying to build, test, and ship quickly. An AI React Native generator completely changes this outdated workflow.
Now, instead of getting bogged down in boilerplate UI code, anyone on the team can just describe what they need. A product manager could type, "Create a user profile screen with a circular avatar at the top, a username, and a grid of their photos below." The generator takes that instruction and produces the actual React Native components, already styled and structured.
From Manual Coder to Product Director
This new approach shifts your role from a hands-on coder to more of a director. You spend less time wrestling with styling a button and more time thinking about the overall user experience and refining the app's flow.
This workflow is a game-changer for everyone on the team:
- Founders & PMs: Build and test an entire MVP flow in a few hours, not weeks. This means you can validate ideas with real users without a massive upfront engineering investment.
- Designers: Transform static Figma mockups into interactive prototypes that run on a real device, making user testing far more valuable and realistic.
- Developers: Skip the repetitive UI setup. You can jump straight into the interesting challenges—the complex business logic, state management, and API integrations where your skills provide the most value.
The goal here isn't to replace developers. It’s to give the entire product team a superpower. The AI handles the foundational UI, freeing up human creativity to focus on what truly matters: building a great product.
Core Benefits for Your Product Team
This table breaks down the key advantages of bringing an AI generator into your workflow. It's not just about speed; it's about making the entire process of building an app smarter and more collaborative.
| Benefit | Impact on Development | Who It Helps Most |
|---|---|---|
| Rapid Prototyping | Go from an idea to an interactive prototype in hours, not weeks. | Product managers and founders who need to validate concepts quickly. |
| Less Repetitive Code | Automates the creation of standard UI components, saving developer time. | Developers who want to focus on business logic and complex features. |
| Design Consistency | Ensures UI components follow consistent design patterns and best practices. | Designers and teams trying to maintain a cohesive design system. |
| Empowers Non-Coders | Lets non-technical team members build and iterate on the app's front-end. | Founders and designers who want to create initial versions without deep coding knowledge. |
| Cost Savings | Less time spent on manual UI coding translates directly to lower development costs. | Businesses of all sizes looking to optimize their development budget. |
Ultimately, these tools help teams build better products faster by handling the grunt work, allowing everyone to concentrate on the bigger picture.
This is a fundamental change in how we think about app development. If you're new to this space, it's worth understanding what is low-code development and how it's making software creation more accessible. The impact is real: teams are reporting workflows that are up to 80% faster for UI creation.
Picking the Right AI Generator for Your Project
The market for AI development tools is exploding, but they are not all created equal. Choosing the right AI React Native generator is the most important first step. It can be the difference between a massive productivity boost and a frustrating waste of time. The best tool for you depends on your project’s needs and how your team already works.
A great place to start is thinking about your workflow. For instance, does the tool have a VS Code extension? For developers, being able to generate, tweak, and integrate code without leaving the editor is a huge win. It avoids constant context switching and keeps them in a state of flow.
Key Features to Look For
Once you've considered how it fits into your daily routine, it's time to look at the tech. If the AI doesn't understand the libraries your team uses, you'll spend more time fixing its output than you would have spent writing the code from scratch.
Here are a few practical things to check for:
- Library and Framework Support: Does the generator support popular styling libraries like NativeWind or component kits like Tamagui? If your app is built on one of these, direct support is essential for getting clean, usable code.
- Design System Awareness: Can you teach the AI your team's design system? A tool that understands your custom components, specific color variables (
primary-blue,text-secondary), and spacing rules will save an incredible amount of time. - Code Quality: Look at the code the tool actually produces. Does it generate a single, messy file? Or does it create modular, well-structured components that a developer would be proud to write? The goal is code that's easy to read and maintain.
If you want a more comprehensive look at what separates the best tools from the rest, we've put together a guide on the best AI app builders that goes into much more detail.
Getting Started: A Practical Guide
After you've picked a generator, setup is usually straightforward. The first step is typically configuring your API key. This securely connects your local machine to the AI service. It's often as simple as adding a single line to an environment file in your project.
Important: Your API key is like a password for your AI assistant. Keep it secure and never commit it to a public GitHub repository. Most tools provide clear documentation on how to manage this safely.
From there, you’ll likely run a quick command in your terminal to initialize the tool. This usually creates a configuration file where you can tell the AI about your project—like your TypeScript settings or which styling library you're using. Once that's done, you're ready to start building.
Writing Prompts That Generate Production-Ready Screens
The quality of the code you get from an ai react native generator directly depends on the quality of your instructions. Mastering the art of the prompt is the single most important skill for turning your ideas into real, working screens. You have to think less like a coder and more like a manager giving clear, detailed directions to a new team member.
This process of guiding an AI is becoming a discipline in itself, closely related to Generative Engine Optimization (GEO). The core idea is simple: the more specific you are, the better the result.
From Vague Idea to Specific Instruction
Here's a common mistake. A product manager might ask for "a login screen." The AI will generate something, but it'll be generic and probably useless. It has no idea about your app's branding, what fields you need, or the layout you're picturing.
A well-crafted prompt, on the other hand, breaks the request down into its essential parts.
Vague Prompt: "Make a login screen."
Helpful, Practical Prompt:
"Create a user login screen. At the top, show our company logo. Below the logo, add two text input fields: one for 'Email Address' and another for 'Password'. The password field should hide the text as the user types. Under the inputs, add a primary button with the text 'Log In'. Finally, include a text link at the very bottom that says 'Forgot Password?'."
See the difference? This level of detail gives the AI a clear blueprint. It specifies components, their order, their labels, and even a key behavior (hiding the password). You've moved from a fuzzy idea to an actionable set of requirements.
If you really want to level up your skills, our complete guide on prompt engineering tips covers more advanced strategies for communicating with these AI models.
How Developers Can Specify Components and Styling
For developers on the team, you can get even more technical to ensure the output matches your project's standards. Instead of just describing the look, you can request specific implementation details.
A Good Prompt:
"Generate a user profile screen with an avatar, name, and three buttons."
A Better, Developer-Focused Prompt:
"Generate a React Native user profile screen using functional components and TypeScript. At the top, create a
Viewthat acts as a header with a dark background color. Inside this header, display a circularImagecomponent for the user's avatar, centered, with a white border. Below the header, show the user's name in a large, boldTextcomponent. Under the name, add three horizontally alignedTouchableOpacitycomponents styled as buttons for 'Posts', 'Followers', and 'Following'."
This prompt is far more powerful because it speaks the language of React Native. By mentioning View, Image, and TouchableOpacity, you’re guiding the AI to use the correct building blocks. The code you get back will be much closer to what a human developer would have written from scratch.
This simple flowchart gives you a high-level look at the process, from picking a tool to actually generating the code.
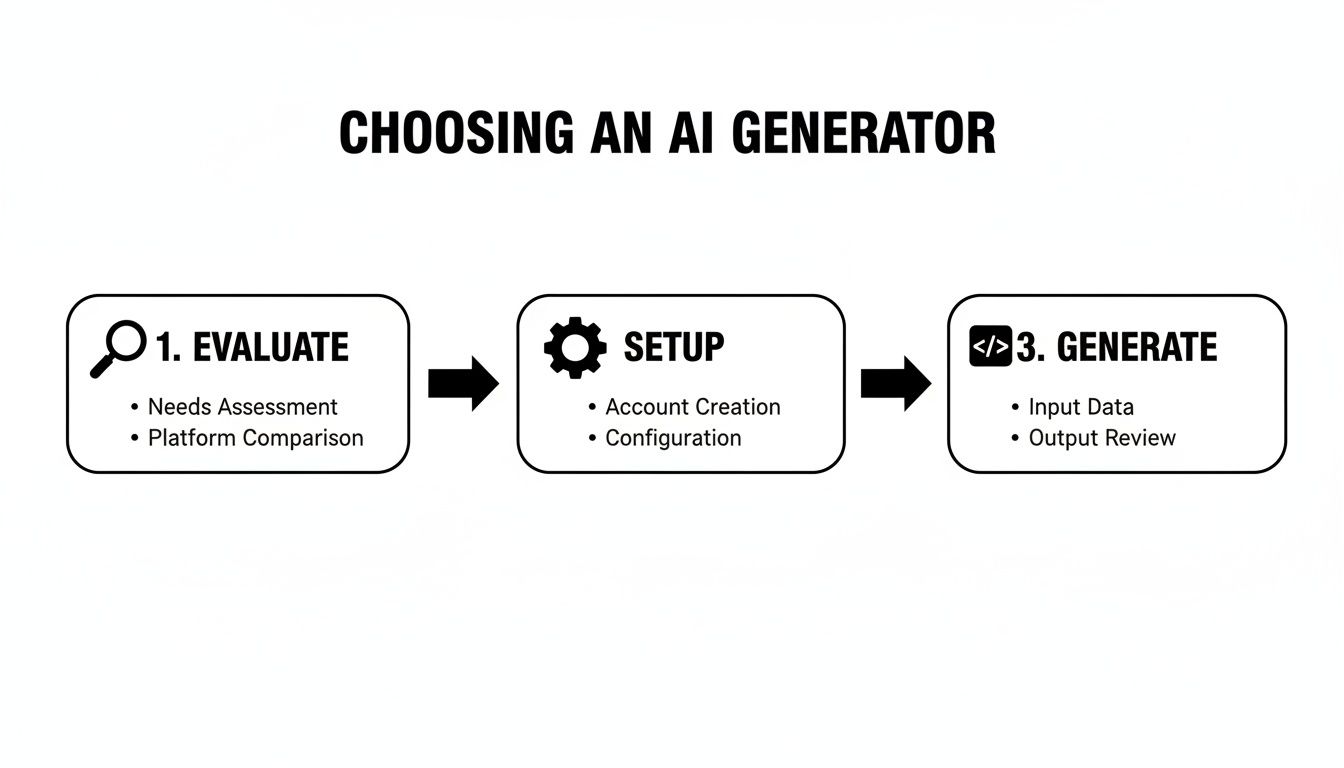
Each step logically follows the last, ensuring that when you finally generate the code, it's based on a solid foundation.
Using Visuals as Prompts: From Figma to Code
Sometimes, words aren't enough. The most advanced generators can now work with visual inputs, which is a massive leap forward for bridging the gap between design and code.
Imagine your designer has a mockup in Figma or you have a quick sketch on a whiteboard. You can upload that image and combine it with a text prompt.
Example Prompt with an Image:
"Based on the uploaded image, build this product detail screen in React Native. Use the image at the top as the product image. The product title should be a large, bold heading. The price should be displayed in green. The 'Add to Cart' button should be full-width with a bright orange background. Ensure all text elements use the font specified in the design."
This approach is the ultimate shortcut for product managers and designers. It eliminates ambiguity and helps ensure the generated UI is a faithful copy of the visual design. You’re turning a static picture directly into an interactive component—it's the fastest way to see your vision come alive on a device.
Refining and Iterating on AI-Generated Code
The first screen you generate is rarely the final version. It's best to think of it as a solid first draft—a starting point from a capable, but new, team member. The real power of an AI React Native generator isn't just that initial output; it's how you can use simple, conversational follow-ups to shape that draft into a polished, production-ready component.
Instead of jumping into the code to make tweaks, you can just talk to the AI. This chat-driven process is what makes modern AI tools so different from the rigid code generators of the past. You get to be the director, guiding the AI with precise instructions until the UI is exactly what you envisioned.
Treat the AI Like a Junior Developer
The most effective way to refine the code is to treat the AI like a junior developer. You wouldn't just give a vague instruction and expect a perfect result, right? You’d offer clear, specific, and actionable feedback. The same idea applies here.
Let's say the AI gives you a standard login button, but it doesn't quite fit your design system. Here's how you could guide it:
- Initial Prompt: "Generate a login screen."
- Styling Follow-up: "Make the primary button larger, use our brand's primary blue color for its background, and change the text to 'Sign Up Now'."
- Layout Follow-up: "Add 16 pixels of vertical margin above that button to give it more space."
- Functionality Follow-up: "Now, add an error message below the email input that only shows when the input is invalid."
See how each command is small and focused? This makes it incredibly easy for the AI to understand and execute. This back-and-forth lets you layer on complexity and fine-tune the design step-by-step.
What to Do When the AI Gets It Wrong
Every now and then, the AI will misinterpret your request or produce code that doesn't quite work. It happens. Before you dive into the code yourself, try clarifying your instructions first.
For instance, if the AI adds an error message that’s always visible, a better follow-up prompt would be:
"The error message you added is always showing. Modify the code to use a
useStatehook to control its visibility, and only show it when anisErrorstate is true."
This approach does two things: it fixes the immediate problem and also helps you learn how to phrase your prompts more effectively for next time. The more you guide the AI, the better it gets at understanding what you actually want. This kind of conversational refinement is quickly becoming a core part of the development workflow. In fact, a recent survey shows that the vast majority of engineers are already experimenting with AI for coding tasks, as shown in the exploding generative AI market on brilworks.com.
By getting good at this dialogue, you can turn a rough AI draft into a pixel-perfect UI, often without needing to manually rewrite big chunks of code.
How to Integrate AI-Generated Code into Your Project
Alright, you've generated your first screen. But now comes the real test: making that AI-generated code work inside your existing app. This is where you move from a cool demo to a genuinely useful part of your professional workflow.
The code from an AI React Native generator needs to do more than just look good. It must fit into your project's architecture, pass your team's code quality checks (linting), and connect to your app's data without causing problems.
Fortunately, this is easier than it sounds. React Native is built on the idea of components, which is a concept that AI models handle remarkably well. They're great at thinking in modular, self-contained blocks, making the code they generate much easier to integrate. For more on this, check out the latest generative AI trends on brilworks.com.
Where to Put the Generated Components
First thing's first: where does this new code live? The answer is simple: treat it just like any other new feature you'd build by hand.
I always create a dedicated directory for the new screen. For a "UserProfile" screen, I’d create a folder at src/screens/UserProfile/. This keeps all its related files—the main component, any sub-components, and styles—organized and easy to find. This self-contained structure is a clean, predictable way to work that anyone else on your team can immediately understand.
Pro Tip for Developers: The very first thing I do after adding the files is run our project's code formatter (like Prettier) and linter (like ESLint). This instantly cleans up any stylistic quirks from the AI and ensures the code matches your team's established standards.
Wiring It Up to Navigation and Data
With the component files in place, it's time to bring the screen to life. This usually involves two key steps: adding it to your navigation flow and connecting it to your app's data.
Here's a quick checklist:
- Import the Screen: Open your main navigator file (e.g.,
AppNavigator.js) and import the new screen component. - Add the Route: Add a new route to your stack navigator, mapping a path like
/profileto your newUserProfilecomponent. - Connect to State: If the screen needs to display data from your global store (like user info), use the appropriate hooks (e.g.,
useSelectorfor Redux) to pull that data in. - Connect Actions: For interactive elements, like a button that updates user info, import your action creators or store methods and connect them to the right event handlers (
onPress, etc.).
By the way, if you're working with existing designs, you might find our guide on turning Figma designs into React Native code helpful. Following these simple integration steps is what turns a cool AI-generated snippet into a maintainable part of your application.
The Future of AI in Mobile App Development
An AI React Native generator is a massive shortcut for building your UI. It’s brilliant at creating screens and components, saving your team hours of tedious work. But it's just as important to understand its current limitations.
These tools aren't yet ready to handle deep business logic, intricate state management, or highly custom animations. Those areas still require the problem-solving skills and experience of a human developer. Think of the AI as your front-end co-pilot. It builds the visual foundation, but the developer is still the one who wires everything up to make the app actually work.
What's on the Horizon?
The pace of change in AI is incredible. Today's limitations are often tomorrow's solved problems. The generative AI market is on track to hit $66.89 billion this year alone, signaling how much investment is pouring into this space. You can dive deeper into the numbers in this research on the state of generative AI on brilworks.com.
This investment is funding some seriously practical advancements. Here’s what’s coming next:
- Smarter Debugging: Imagine an AI that not only finds a bug but also understands the context of your code and suggests a sensible fix.
- Automated UI Testing: Soon, these generators could write and run tests for the very screens they create, catching bugs before a user ever sees them.
- Full-Feature Generation: We're moving beyond single screens. The next leap is prompting something like, "Build a complete in-app chat feature with real-time messaging," and getting back the UI, state logic, and even the boilerplate for API connections.
The trajectory is clear: AI is evolving from a simple component generator into a true development partner. This shift will free up entire product teams to focus on strategy, user experience, and innovation, leaving more of the implementation work to the machine.
Keeping up with these changes is how your team will stay ahead of the curve. The more capable AI becomes, the more powerful it will be as a tool in your workflow.
Ready to build your next mobile app faster? With RapidNative, you can turn your ideas into production-ready React Native screens in minutes. Start building for free at RapidNative.
Ready to build your app?
Turn your idea into a production-ready React Native app in minutes.
Free tools to get you started
Free AI PRD Generator
Generate a professional product requirements document in seconds. Describe your product idea and get a complete, structured PRD instantly.
Try it freeFree AI App Name Generator
Generate unique, brandable app name ideas with AI. Get creative name suggestions with taglines, brand colors, and monogram previews.
Try it freeFree AI App Icon Generator
Generate beautiful, professional app icons with AI. Describe your app and get multiple icon variations in different styles, ready for App Store and Google Play.
Try it freeFrequently asked questions
What is RapidNative?
RapidNative is an AI-powered mobile app builder. Describe the app you want in plain English and RapidNative generates real, production-ready React Native screens you can preview, edit, and publish to the App Store or Google Play.
Can I export the code?
Yes. RapidNative generates clean React Native and Expo code that you can export at any time. No lock-in, no proprietary format. Hand it to your developers or keep building inside RapidNative.
Is RapidNative free to use?
Yes. You can build apps on the free plan with no credit card required. Paid plans unlock unlimited AI generations, code export, and direct publishing to the App Store and Google Play.
Do I need to know how to code?
No. Most users build apps by describing what they want in plain English. Developers can drop into the code whenever they want more control, but coding is optional.
How long does it take to build an app?
Most users have a working first screen in under a minute. A full MVP usually takes a few hours instead of the weeks or months traditional development requires.