How to Build a Mobile App Prototype in Minutes (and Get It Right)
Learn how to build a prototype for your mobile app with AI. This guide shows you how to go from idea to interactive React Native code in minutes.
By Suraj Ahmed
17th Jan 2026
Last updated: 17th Jan 2026
That blank screen staring back at you when you’re trying to bring a new app idea to life can be intimidating. But what if you could skip weeks of design and coding to go from a simple idea to a fully interactive prototype on your phone in just a few minutes? Thanks to AI, you can now describe your app in plain English and generate a native mobile experience with real, exportable React Native code.
This guide will show you how to build a prototype in minutes, not weeks, so you can get valuable user feedback and give your developers a massive head start.
Why AI Prototyping Is a Game-Changer for Mobile Products
Getting a mobile app prototype off the ground used to be a real slog. It was a slow, expensive grind of back-and-forth between designers and developers just to get a single interactive screen working. That friction meant great ideas often died on the whiteboard, starved of the user feedback needed to move forward.
That old model just doesn't cut it anymore. With the global AI mobile app market on a trajectory to hit $221.9 billion by 2034, speed is everything. It's no surprise that 63% of developers are already weaving AI into their workflows. Just a few years ago, a basic prototype could easily take 4-6 weeks and set you back over $20,000 simply to test a UI flow. Now, AI-driven tools can translate a simple prompt into production-ready React Native screens in minutes. This completely flips the script on early-stage development.
From Idea to Interactive in Three Steps
The workflow has been boiled down to its essence, turning what was once a multi-week marathon into a quick, three-step sprint for anyone on the product team.
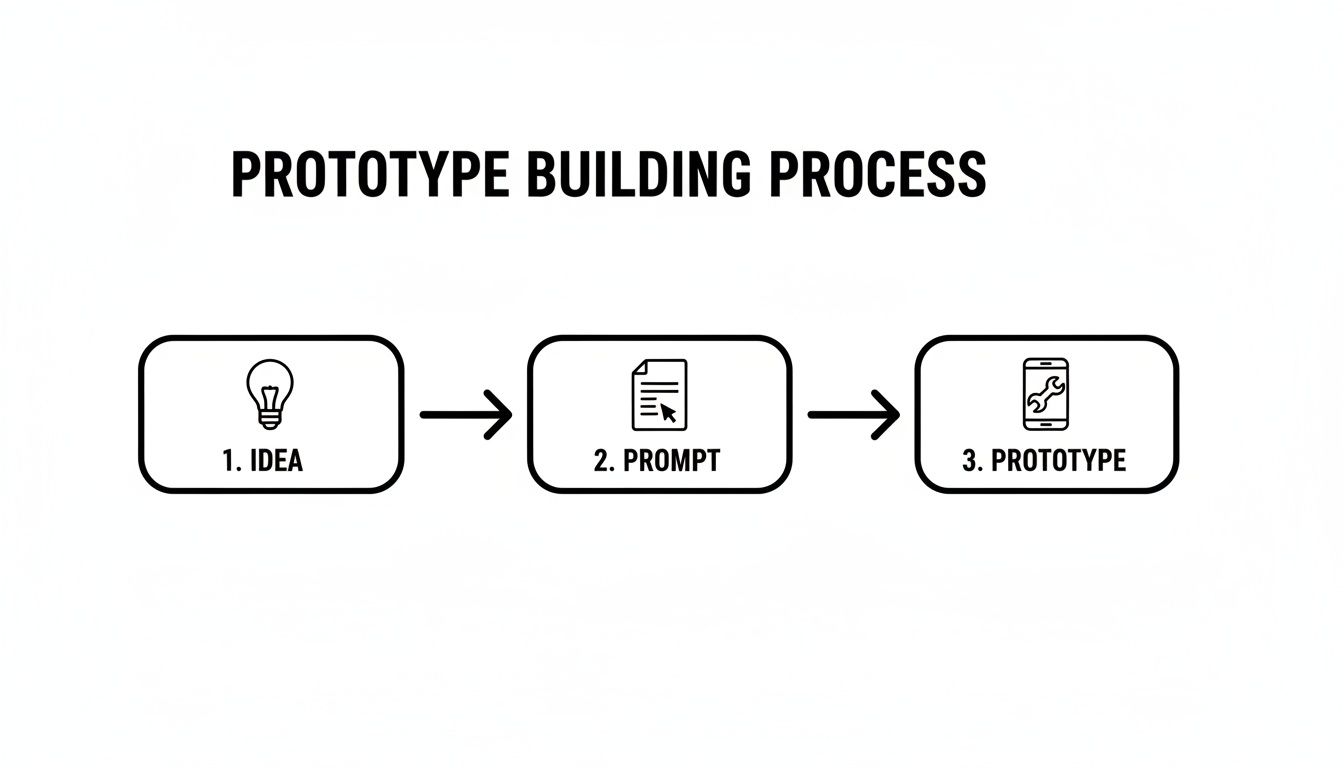
This simple journey—from raw idea, to a detailed prompt, to a tangible prototype—is a massive leap forward. It puts the power to create directly into the hands of non-technical founders and product managers, no coding required.
And we're not just talking about static mockups here. This is about generating a high-fidelity experience that looks and feels like a real app running on a device. This shift helps everyone involved:
- For Founders and PMs: You can get your core vision and user flows in front of stakeholders and potential users almost immediately.
- For Designers: Concepts come to life in a true native environment, making it much easier to test interactions and nail the user experience on an actual phone.
- For Developers: They can bypass the tedious setup and boilerplate, starting instead with a clean, well-structured React Native codebase. This frees them up to focus on the complex backend logic and what makes your app unique.
The difference between the old way and the new way is stark.
Traditional vs AI-Powered Prototyping at a Glance
| Metric | Traditional Prototyping | AI-Powered Prototyping (with RapidNative) |
|---|---|---|
| Time | 4-6 Weeks | 5-10 Minutes |
| Cost | $10,000 - $25,000+ | Starts at $0 |
| Output | Figma files, static mockups | Interactive prototype + production-ready React Native code |
As you can see, the jump in efficiency is massive. What used to be a significant budget item and a major time sink is now an accessible, rapid process that yields far more than just a picture of an app.
If you want to dig deeper into turning your ideas into a real product, see how an AI app builder can bridge the gap between a simple description and a fully coded UI. These tools are fundamentally speeding up the entire product development lifecycle.
Crafting Your Initial Prompt: The Blueprint for Your Prototype
Getting your app’s prototype off the ground starts with clear, targeted instructions. Think of your prompt as a concise brief for a junior designer—direct, specific, and purpose-driven. This is the single most important step to get right.

If you simply ask for “a social media app,” you’ll end up with a generic shell. Instead, break your idea into screens, navigation, and key interactive elements. That level of detail gives the AI a solid starting point.
From Vague Idea To Actionable Prompt
You want to swap guesswork for precision. Here’s a quick comparison based on a fitness tracker concept:
- Vague Prompt: “I need a fitness app that shows activity.”
- Actionable Prompt: “Create a mobile app with a bottom tab bar. The tabs should be: Dashboard, Workouts, and Profile. On the Dashboard screen, display today’s step count in a large card, list recent activities underneath, and include a floating action button to start a new workout.”
The second version lays out the navigation pattern, names each screen, and calls out specific UI components. That’s the kind of roadmap the AI can follow without circling back.
A well-structured prompt isn’t about being overly technical; it’s about being incredibly clear about the user’s journey. By defining the main screens and how they connect, you’re building the skeleton of your user experience from the very first step.
Essential Elements For Your First Prompt
When you kick off your initial generation, make sure to cover these three pillars. They’ll keep your prototype focused and functional. For even more advanced advice, check our guide on prompt engineering tips for UI generation.
-
Core Navigation Specify whether you need a bottom tab bar, a side drawer, or stack navigation. For example, "Create a bottom tab bar with Home, Search, and Profile tabs."
-
Key Screens List the main views: think Login/Sign Up, Home/Dashboard, Settings, Profile, and any custom pages central to your app’s purpose.
-
Major UI Components Describe the standout elements for each screen. Do you want a search bar at the top of Home? An avatar and photo grid on Profile? Detail cards, lists, buttons, and input fields so the AI knows exactly what to generate.
With these guidelines, your first prompt will deliver a prototype that feels like a solid foundation—ready for tweaks, tests, and eventual handoff.
Refining Your Screens with Conversational AI
Once your first set of screens appears, the real fun begins. This is where you start molding the prototype into what you actually pictured in your head. Instead of writing up a ticket or fiddling with properties in a design tool like Figma, you just have a conversation with the AI.
This chat-based approach really opens up the process. A product manager can directly shape the UI without being a design expert, and a founder can try out a new color palette in just a few seconds. It breaks down the old barriers.
Making Precise Changes with Simple Commands
The real power here is how direct it is. You see something you want to adjust, you describe it in plain English, and the AI gets it done. It parses your request and applies it, keeping everything consistent across the app.
Let's imagine you're working on a social feed screen. Here’s the kind of feedback you could give:
- Styling Adjustments: "Change the main call-to-action buttons to a bright green, maybe hex code #10B981."
- Layout & Spacing: "Increase the vertical padding between the items in the user list. They need more room to breathe."
- Adding Components: "Put a small heart icon button on the bottom right corner of each post card in the feed."
- Text & Content: "Can you update the header on the profile screen? Change it from 'My Profile' to 'Account Settings'."
This back-and-forth feels a lot like you're directing a junior developer who happens to work at lightning speed.
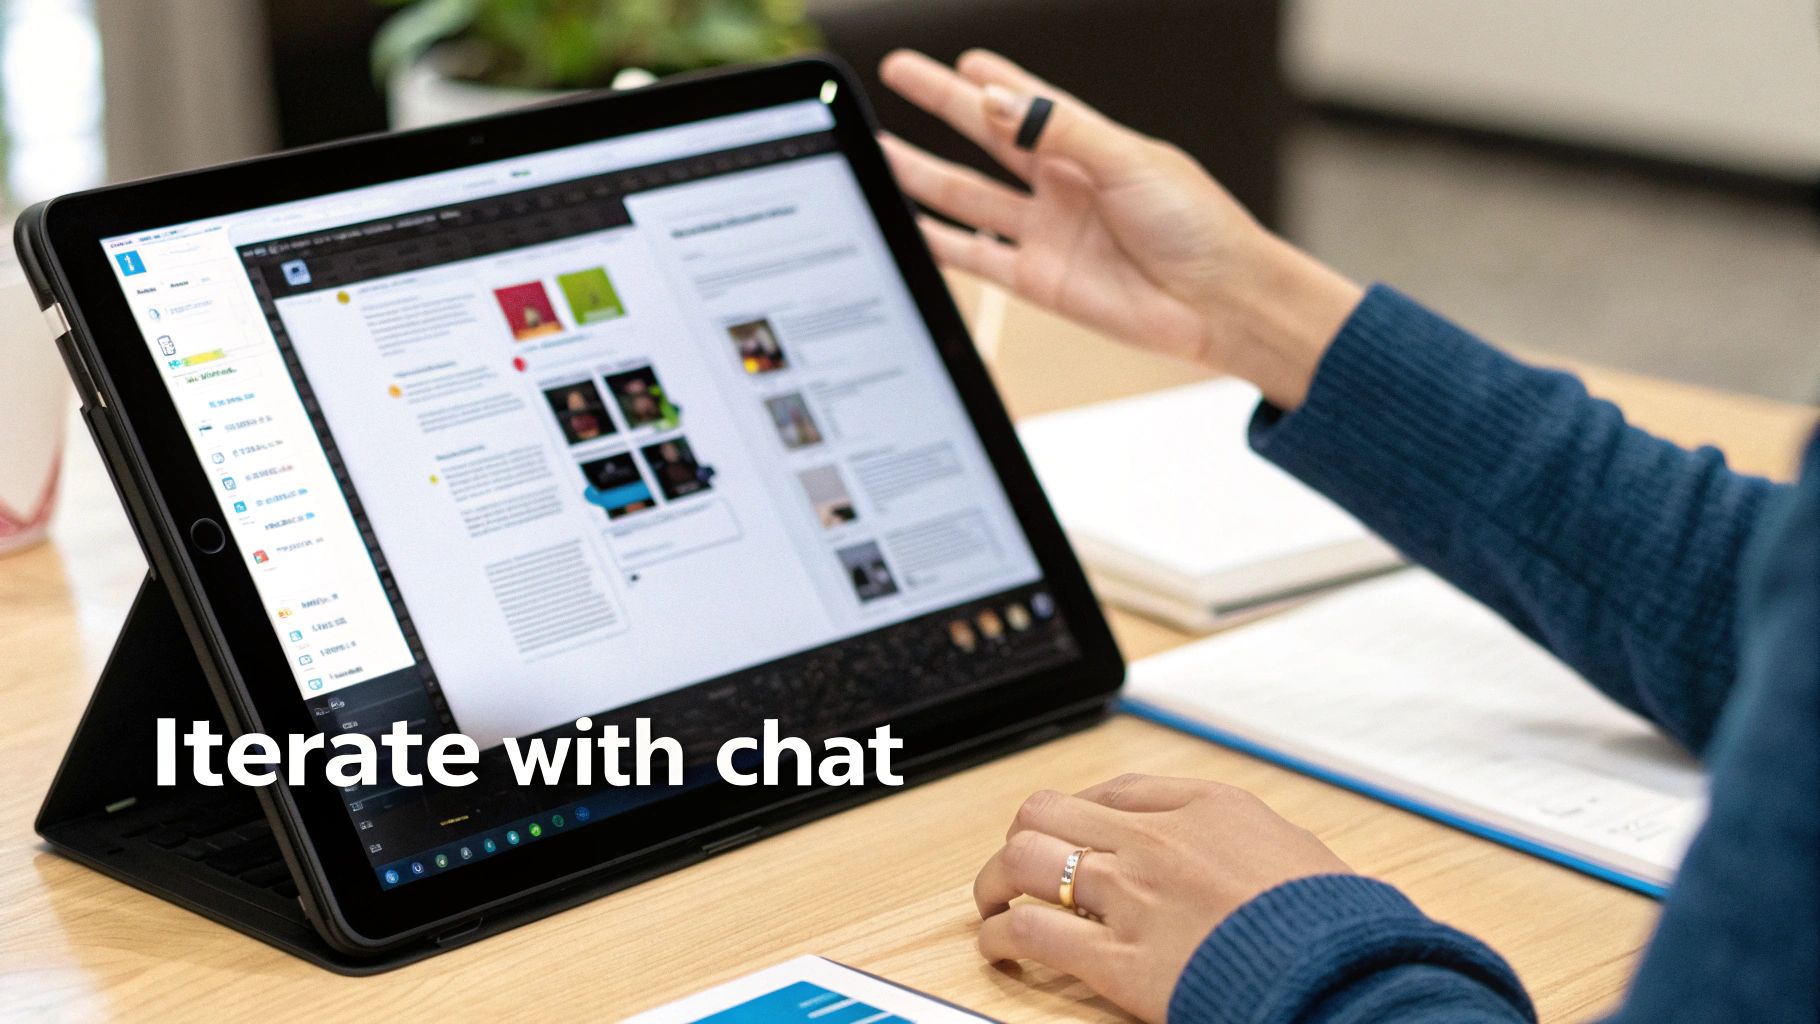
Here's a quick look at the chat interface where these commands come to life.
The screenshot shows a simple, text-based chat where you type your instructions to modify the screens. It's this instant feedback loop—from command to visual change—that makes the whole process so incredibly efficient.
The Power of Iteration without the Friction
Prototyping tools have come a long way. Low-code and no-code platforms let non-developers build real mobile prototypes in days, not months. This is a massive shift, especially when you consider that frameworks like Flutter, with its 1 million monthly active developers, now power 30% of iOS apps. It used to be that an estimated 80% of app ideas failed before even getting to the prototype stage because of the cost and time involved. Modern tools can slash build times by up to 60% with ready-made assets.
RapidNative takes this a step further. You can describe a login screen with tab navigation, and a moment later, export fully interactive React Native code.
The whole point is to shrink the distance between an idea and a working product. When you see your changes show up on a live prototype instantly, you feel empowered to experiment and fine-tune your way to a much better user experience.
This conversational refinement is a key feature of an AI React Native generator, which is designed to create real, extensible code—not just a pretty picture. Every single tweak you make through chat is actually editing the code under the hood.
This means that even non-technical team members are directly contributing to the final codebase in a structured and guided way. When it's finally time for handoff, the developer gets a clean, well-vetted foundation that truly reflects what the product team envisioned.
Testing Your Prototype on a Real Device
A design can look absolutely perfect on a big desktop monitor, but feel completely wrong the moment you hold it in your hand. This is precisely why getting your prototype off your computer and onto an actual phone is a non-negotiable step. It’s the only real way to get a feel for the user experience and catch issues you would have otherwise missed.
The second you’re holding the app, you gain a whole new perspective. You’ll immediately notice if buttons are too small for your thumb, if the text is hard to read in a brightly lit room, or if the navigation just feels… off. This kind of hands-on testing is where you spot the usability flaws before a single line of production code gets written.
Thankfully, getting your app onto a device isn't the headache it used to be. Tools built on frameworks like Expo often let you load a live prototype onto your phone simply by scanning a QR code. This creates an incredibly fast feedback loop between the design on your screen and the real-world test in your hand. We have a whole guide that dives deeper into the Expo QR code process if you want to see how it works.
Your On-Device Testing Checklist
Once you’ve got the prototype running on your phone, resist the urge to just poke around without a plan. You'll get much more valuable feedback if you're intentional. A little structure goes a long way here.
Try running through this quick checklist to guide your review:
- Navigation Flow: Can you move from screen to screen without thinking too hard? Is it always clear how to get back to where you came from?
- Tap Targets: Are all the buttons and links easy to hit with your thumb? This is especially important for anything placed near the corners of the screen.
- Text Readability: Check all the text, from big headlines to tiny labels. Is everything legible on a smaller screen and at a normal viewing distance?
- Overall Feel: Beyond the visuals, how does the app feel? Is it snappy and responsive? Do the animations and screen transitions feel natural or jarring?
This on-device check is the ultimate reality check for your design. It transforms your app from a theoretical concept into something tangible, immediately exposing any awkward or frustrating parts of the experience.
Going through this process is a critical part of how you build a prototype. The insights you collect here are gold. You can jump right back into the chat to make quick, meaningful tweaks before ever handing the project off to a developer, ensuring what they build is already on a solid, user-tested foundation.
Exporting Production-Ready Code for Developer Handoff
Alright, you’ve planned your flows, iterated with chat, and tested a working version of your app on an actual device. Now you have a high-fidelity prototype that feels right. This is where a tool like RapidNative really shines, because we’re not just talking about a mockup anymore—we're talking about real, usable code.
The whole point of this process isn't to create a pretty picture; it's to build a prototype that becomes the direct foundation for your production app.

Unlike closed-off, no-code platforms that can feel like a trap, the final step here is to export a clean, extendable source code project. This one feature completely changes the game when it's time to bring in your development team.
From Prototype to Project
When you hit "export," you get a complete React Native project that's already structured with best practices in mind. This isn't some jumbled mess of machine-generated code. It’s a well-organized starting point that includes:
- TypeScript: For type safety, which makes the code easier to maintain and less prone to bugs down the road.
- Expo: A framework that massively simplifies the build process and takes the headache out of managing native modules.
- NativeWind: A utility-first styling system that makes theming and customizing your UI incredibly consistent and straightforward.
Handing this over to your developers gives them a massive head start. They can pull down the project, understand the structure immediately, and get straight to work without having to painstakingly recreate every single screen from a design file.
The impact here is huge. Think about it: untested UIs have historically been a major reason why 70% of apps flopped post-launch. That failure rate cost companies an estimated $50 billion annually in rework. Modern, AI-first tools are poised to cut those failure rates by as much as 50% by helping us spot usability problems early on. While design tools like Figma are fantastic for creating advanced interactions, they don't always offer a direct bridge to code. AI generators fill that critical gap, producing Expo-ready scaffolds that connect design to development. You can discover more insights about mobile app development trends from Graphem.
Best Practices for a Smooth Developer Handoff
Exporting the code is just the first part of the puzzle. A truly successful handoff comes down to clear communication and providing the right context. You’re not just tossing a folder of files over the fence; you're transferring the ownership and vision of the product.
The ultimate goal of a handoff is to empower your engineering team. Provide them with not just the 'what' (the code) but also the 'why' (the user flows and interaction logic), so they can build with confidence and clarity.
To set your team up for a win, take a few minutes to prepare a concise handoff package. This small bit of effort ensures your developers can get up to speed quickly and start plugging in the backend logic without a ton of back-and-forth.
A great handoff starts with a clear checklist. Here are the key items I've found make the whole process smoother and eliminate a ton of confusion for the development team.
Developer Handoff Checklist
| Handoff Item | Description | Why It's Important |
|---|---|---|
| Exported Codebase | The complete React Native project, zipped and shared via a repository like GitHub. | Provides the foundational UI and navigation, saving hundreds of hours of manual coding. |
| User Flow Diagrams | Simple diagrams or a quick video walkthrough showing how screens connect. | Helps developers understand the intended user experience and the logic behind the navigation. |
| Component States | Notes on different states for UI elements (e.g., button disabled state, loading indicators). | Clarifies interactive behavior that might not be obvious from the code, preventing guesswork. |
| Key Interaction Notes | A brief document explaining any non-obvious interactions or animations. | Ensures subtle but important UX details are implemented correctly from the start. |
By using a simple checklist like this, you can turn the handoff from a point of friction into a genuinely collaborative and efficient kickoff. It’s the best way to ensure the final product stays true to the prototype you've so carefully built and tested.
Common Questions About AI Prototyping
Diving into a new way of building products always brings up questions. It's totally natural. Whether you're a founder, PM, designer, or developer, you need to know what you're working with.
Here are straightforward answers to the most common questions about building a prototype with AI.
Can I actually build a fully functional app this way?
AI prototyping tools are fantastic at generating the entire front-end of your app—the part users see and touch. This includes the UI, screen layouts, and core navigation. The output is a high-fidelity prototype built with real, production-ready React Native code.
What it doesn't do is write your backend logic. Think of the AI as your front-end specialist. Your developers will still need to take the exported code and hook it up to your APIs, databases, and other services to make the app truly work.
What if I have no design skills? Will my prototype still look good?
Absolutely. This is one of the biggest wins of using an AI builder that has a professional design system, like NativeWind, built right in. You’re not starting from a blank canvas and hoping for the best. Instead, you're telling the AI how to assemble pre-designed, professional components that already follow best practices for mobile apps.
This means your prototype gets consistent spacing, solid typography, and cohesive color schemes right out of the gate. It'll look polished and professional, even if you’ve never opened a design tool in your life.
How is this different from a no-code builder?
The real difference comes down to the final output and the freedom it gives you. Many of the common questions about AI prototyping circle back to how you can scale up, and sometimes that involves outside help. You can often find useful perspectives by checking out AI Automation Agency Services.
Your typical no-code builder locks you into its platform. You can build your app, sure, but the source code is theirs. If you outgrow their platform or need a custom feature they don’t offer, you’ve hit a dead end and have to start over from scratch.
An AI code generator like RapidNative gives you the best of both worlds. You get the speed and ease of a visual builder, but you also get the single most important thing: real, human-readable React Native source code that you can own and export. Your prototype isn't a dead end; it’s the actual starting block for your production app.
This means any React Native developer can jump in, take the code the AI generated, and keep building. There are no proprietary walls to worry about. It’s all about getting a massive head start, not getting stuck in a closed system.
Do I need to be a coder to use this?
Not at all—at least not for the prototyping part. The whole process, from idea to interactive prototype, is designed to be code-free. You use plain English to describe your app, generate screens, tweak things with chat commands, and test it on your phone.
You'll only need to bring in a developer when you’ve exported the final code and are ready to connect the backend and build out your app's core logic.
Ready to stop staring at a blank screen and start building? With RapidNative, you can turn your app idea into an interactive, native prototype with exportable code in just minutes. Describe your app, iterate with chat, and accelerate your entire development workflow. Get started for free at RapidNative.
Ready to build your app?
Turn your idea into a production-ready React Native app in minutes.
Free tools to get you started
Free AI PRD Generator
Generate a professional product requirements document in seconds. Describe your product idea and get a complete, structured PRD instantly.
Try it freeFree AI App Name Generator
Generate unique, brandable app name ideas with AI. Get creative name suggestions with taglines, brand colors, and monogram previews.
Try it freeFree AI App Icon Generator
Generate beautiful, professional app icons with AI. Describe your app and get multiple icon variations in different styles, ready for App Store and Google Play.
Try it freeFrequently asked questions
What is RapidNative?
RapidNative is an AI-powered mobile app builder. Describe the app you want in plain English and RapidNative generates real, production-ready React Native screens you can preview, edit, and publish to the App Store or Google Play.
Can I export the code?
Yes. RapidNative generates clean React Native and Expo code that you can export at any time. No lock-in, no proprietary format. Hand it to your developers or keep building inside RapidNative.
Is RapidNative free to use?
Yes. You can build apps on the free plan with no credit card required. Paid plans unlock unlimited AI generations, code export, and direct publishing to the App Store and Google Play.
Do I need to know how to code?
No. Most users build apps by describing what they want in plain English. Developers can drop into the code whenever they want more control, but coding is optional.
How long does it take to build an app?
Most users have a working first screen in under a minute. A full MVP usually takes a few hours instead of the weeks or months traditional development requires.