Stripe React Native: A Practical Guide to Mobile Payments
Learn to implement Stripe React Native with our guide on setup, PaymentSheet, backend logic, and testing. Build secure, seamless payment flows in your app.
By Suraj Ahmed
28th Jan 2026
Last updated: 28th Jan 2026

Adding payments is the moment of truth for any mobile app. It’s when your idea turns into a real business. For teams building with Stripe and React Native, this isn't just about dropping a "Buy Now" button into the UI. It’s about creating a secure, smooth, and trustworthy financial experience that users feel good about.
Why Getting the Payment Experience Right is Everything
Let's be honest: a clunky or sketchy-looking checkout is the fastest way to lose a customer. In the mobile world, where you have seconds to keep someone's attention, a seamless payment flow isn't a "nice-to-have"—it's a core feature that directly impacts your bottom line.
This is why the combination of Stripe and React Native is so powerful for the entire product team.

From Code to Conversions
For product managers and designers, the goal is a frictionless user journey that converts. Stripe's official React Native library is a huge help here. It provides pre-built UI components like the PaymentSheet, which delivers a polished, native checkout experience right out of the box. You get Apple Pay, Google Pay, and standard card inputs with minimal design effort, letting you focus on the rest of the app.
For founders, it's often all about speed and efficiency. React Native is a game-changer for building one app that works on both iOS and Android. Some companies have even seen cost savings as high as 40% compared to building two separate native apps. That efficiency means you can launch your product, test pricing, and start generating revenue much faster.
For developers, this stack is a dream. You get a well-documented, battle-tested library from a leader in payments, combined with the clean, component-based world of React Native. It makes complex payment logic much easier to build and maintain.
Making the Right Choice for Your Stack
While Stripe is a fantastic and popular option, it pays to know the landscape. Every payment processor has its strengths. For example, if your business model involves complex subscription billing or operates in specific international markets, digging into a detailed Braintree vs Stripe comparison can help you confirm you're choosing the best partner for your long-term needs.
Ultimately, integrating Stripe into your React Native app is more than a technical task. It’s about giving your team the tools to build a secure and user-friendly payment system that fuels your business. This guide will walk you through that entire process, step by step.
Getting Your Development Environment Ready for Stripe
Alright, let's get hands-on. Before you can process a single payment, you need to set up your project correctly. Getting your stripe-react-native environment right from the start will save you from common headaches later.
First, you need to add the official Stripe library to your project. This is a quick one-liner in your terminal. From your project's root folder, run one of these commands:
For npm users:
npm install @stripe/stripe-react-native
For yarn users:
yarn add @stripe/stripe-react-native
This command installs the JavaScript part of the library. Because it also interacts with native device features (like Apple Pay and Google Pay), you need to link the native code. For iOS, navigate into your ios directory (cd ios) and run pod install. Android usually handles this linking automatically when you build the app.
Handling Your Stripe API Keys
To talk to Stripe's services, your app needs API keys. You can find these in your Stripe Dashboard under the "Developers" section. You'll work with two main keys:
- Publishable Key: This is for your React Native app (the "client-side"). It starts with
pk_and is safe to include in your app's code. - Secret Key: This is for your backend server only. It starts with
sk_. Never, ever put your secret key inside your mobile app. Exposing it is like handing over the keys to your entire Stripe account.
The best way to manage these is with environment variables. Create a .env file in your project's root and store your publishable key there.
STRIPE_PUBLISHABLE_KEY=pk_test_YourPublishableKeyValue
Don't forget to add .env to your .gitignore file to prevent accidentally committing it to a public repository. A library like react-native-dotenv is perfect for accessing these variables safely in your app.
A Few Platform-Specific Tweaks
While React Native smooths over most platform differences, some native libraries like Stripe's require small adjustments to the native project files.
For iOS, you may need to set a minimum iOS version. Stripe’s library needs a relatively modern version, so you might have to update this line in your ios/Podfile:
platform :ios, '13.0'
For Android, you'll want to ensure your minSdkVersion in android/build.gradle is high enough. Check the Stripe documentation for the latest requirement, but a value of 21 or higher is usually a safe starting point.
Think of this setup phase as building the foundation for a secure and stable payment system. Taking the time to manage API keys properly and configure the native projects correctly prevents the most common and frustrating bugs that teams hit during Stripe integration.
Wrapping Your App with the StripeProvider
With the library installed and keys ready, the final setup step is to wrap your entire application with the StripeProvider. This component makes the Stripe SDK available to every other screen and component in your app.
You'll typically do this in your main entry file, like App.js.
import { StripeProvider } from '@stripe/stripe-react-native';

function App() {
  return (
    <StripeProvider
      publishableKey={process.env.STRIPE_PUBLISHABLE_KEY}
    >
      {/* The rest of your app's components go here */}
    </StripeProvider>
  );
}
This initializes Stripe using the publishable key from your environment variables. If you’re building with Expo, the process is very similar. For a deeper dive into that workflow, check out this guide on how to create a new Expo app.
With that, your environment is ready. Now we can start building the actual checkout flow.
Building a Secure Backend for Your Payments
Your React Native app is the storefront, but the real security work happens on your backend server. Your server acts as the secure middleman that talks directly to Stripe, keeping your most sensitive data and operations safely away from the user's device. This separation isn't just a good idea—it's essential for security.
Here’s the golden rule: your Stripe Secret Key must never be included in your React Native app's code. If it were exposed, anyone could decompile your app, find that key, and gain full control over your Stripe account. They could issue refunds, access customer data, and cause serious financial damage. Your backend is the gatekeeper that ensures this never happens.
Instead of the app trying to process a payment directly, its job is simply to ask your backend, "Hey, my user wants to buy something for X amount." Your backend then handles the secure parts.
The PaymentIntent: Your Transaction's Lifeline
To manage this process, Stripe uses an object called a PaymentIntent. Think of it as a digital record that tracks a single payment from start to finish. It moves through different stages, like requires_payment_method, requires_confirmation, and finally, succeeded.
Using a PaymentIntent means you can handle complex scenarios, like payments that need extra authentication with 3D Secure, without building all that logic yourself. Your backend creates the PaymentIntent, and your frontend app uses a special, temporary token called a client_secret to complete the payment without ever needing your main secret key.
Here’s what a PaymentIntent object looks like, straight from the Stripe API documentation.
As you can see, it contains fields like a unique ID, the amount, currency, and its current status. That client_secret is the special token your React Native app will use to securely complete the payment on the user's device.
Creating Your Backend Endpoint
Okay, let's build it. Here’s a simple but secure backend example using Node.js and the popular Express framework. This server will have one job: to provide a /create-payment-intent endpoint that our React Native app will call when a user is ready to pay.
Here’s another critical security rule: always calculate the final purchase amount on the server. Never trust an amount sent from the app. It’s too easy for a malicious user to intercept the request and change a $100 purchase to $1. Your server must be the single source of truth for pricing.
In this example, our backend creates a PaymentIntent with a fixed amount. In a real app, you would calculate this based on the items in the user's shopping cart stored in your database.
// A simple Node.js + Express server
const express = require('express');
const app = express();
// This is your test secret API key - keep it safe on the server!
const stripe = require('stripe')('sk_test_...');

app.post('/create-payment-intent', async (req, res) => {
  try {
    // In a real app, you'd calculate the order amount from a database.
    // For this example, we'll hardcode it to represent $10.99.
    const amountInCents = 1099;

    const paymentIntent = await stripe.paymentIntents.create({
      amount: amountInCents,
      currency: 'usd',
      automatic_payment_methods: {
        enabled: true,
      },
    });

    // Send only the client secret back to the app
    res.send({
      clientSecret: paymentIntent.client_secret,
    });
  } catch (error) {
    res.status(400).send({
      error: {
        message: error.message,
      },
    });
  }
});

app.listen(4242, () => console.log('Node server listening on port 4242!'));
When your app calls this endpoint, the server does two crucial things:
- It creates a PaymentIntent using a secure, server-verified amount.
- It returns only the
client_secretback to the app.
This client_secret is a temporary key for that specific transaction. It authorizes the app to confirm this one payment and nothing more. This architecture keeps your main secret key locked down on the server, securing your entire payment system. React Native’s performance helps make this client-server communication feel instant to the user. Its massive adoption—with over 2.5 million weekly npm downloads and 118,000+ GitHub stars—shows how much developers trust it to build these kinds of robust experiences. You can dive deeper into the future of development with React Native to see why it remains a solid choice.
Treat your backend as the sole guardian of your Stripe secret key and the definitive source for payment amounts. This server-side approach isn't just a suggestion; it's the industry standard for securely integrating payment processors like Stripe into any mobile app.
Building the Checkout Flow in Your React Native App
With your backend ready to create PaymentIntents, we can now focus on the front end—the part your users will actually see and interact with. The @stripe/stripe-react-native library gives you two great options for building your checkout experience. The choice you make comes down to a classic trade-off: speed and simplicity versus total design control.
No matter which path you take, the process follows a secure, three-way handshake between your app, your server, and Stripe.
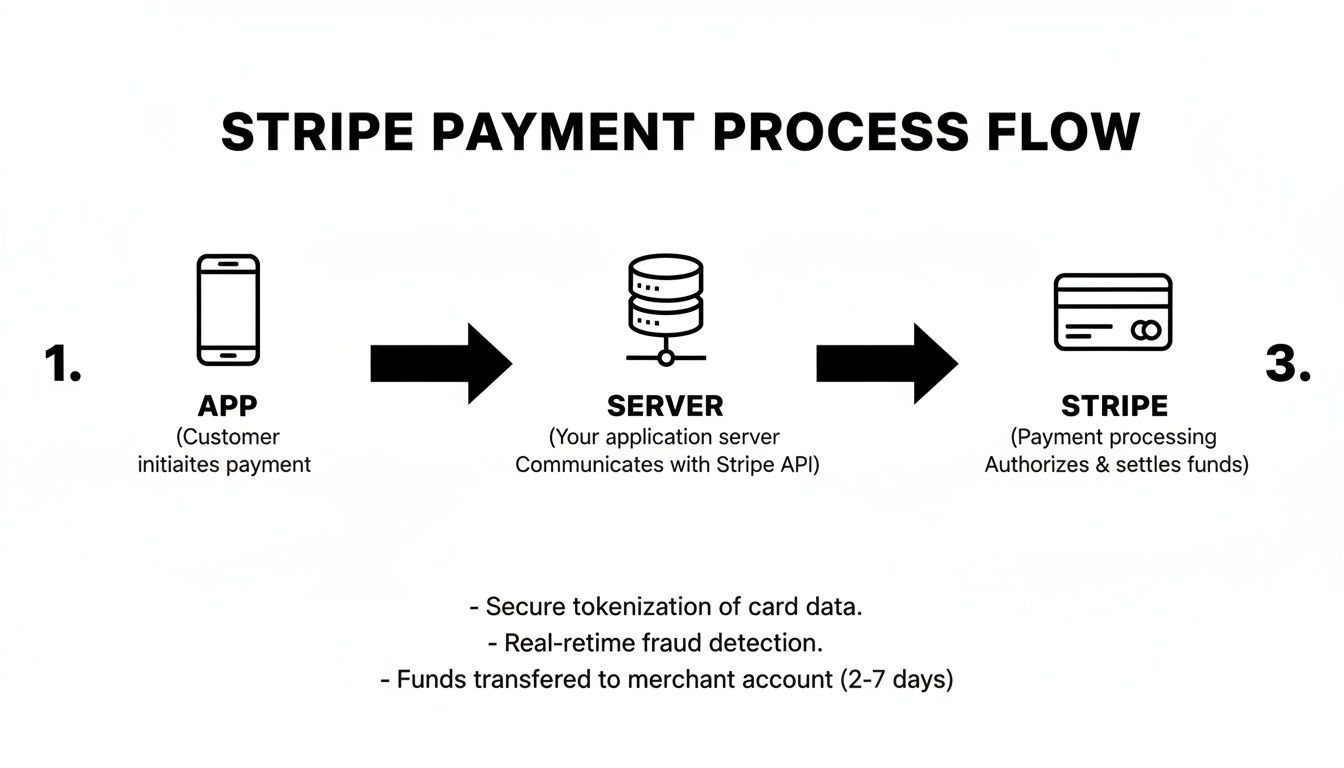
As this diagram shows, your app doesn't handle sensitive card data directly. It just tells your server, "My user is ready to pay." Your server then talks to Stripe to create a secure PaymentIntent, and Stripe gives back that temporary client_secret that your app can use to finish the job. This keeps everything secure and PCI compliant.
The Fast Lane with PaymentSheet
If you need to get a polished, fully-featured checkout screen up and running fast, Stripe’s PaymentSheet is your best friend. It’s a pre-built UI that handles everything: card entry, validation, Apple Pay, Google Pay, and it even adapts to the phone's light or dark mode automatically.
The beauty of the PaymentSheet is how little code it takes to implement. You initialize it with the client_secret from your backend, present it to the user, and listen for the result. It handles complex flows like 3D Secure authentication and error messages for you, which can save days of development time.
Use
PaymentSheetwhen speed to market is a priority. It provides a familiar, trustworthy user experience without you having to build it from scratch, freeing you up to focus on your app's unique features.
Here’s a practical example of a CheckoutScreen component that uses PaymentSheet. Notice the loading state—it's crucial for giving users clear feedback while the app communicates with your server.
import React, { useState, useEffect } from 'react';
import { View, Button, Alert } from 'react-native';
import { useStripe } from '@stripe/stripe-react-native';

const CheckoutScreen = () => {
  const { initPaymentSheet, presentPaymentSheet } = useStripe();
  const [loading, setLoading] = useState(false);

  const fetchPaymentSheetParams = async () => {
    // Replace with your actual backend endpoint
    const response = await fetch('YOUR_BACKEND_URL/create-payment-intent', {
      method: 'POST',
      headers: { 'Content-Type': 'application/json' },
    });
    const { clientSecret, customer, ephemeralKey } = await response.json();
    return { clientSecret, customer, ephemeralKey };
  };

  const initializePaymentSheet = async () => {
    const { clientSecret, customer, ephemeralKey } = await fetchPaymentSheetParams();

    const { error } = await initPaymentSheet({
      customerId: customer,
      customerEphemeralKeySecret: ephemeralKey,
      paymentIntentClientSecret: clientSecret,
      merchantDisplayName: 'My Awesome App',
    });

    if (error) {
      Alert.alert(`Error: ${error.code}`, error.message);
    }
  };

  const openPaymentSheet = async () => {
    setLoading(true);
    const { error } = await presentPaymentSheet();
    setLoading(false);

    if (error) {
      Alert.alert(`Error: ${error.code}`, error.message);
    } else {
      Alert.alert('Success', 'Your payment was confirmed!');
    }
  };

  useEffect(() => {
    initializePaymentSheet();
  }, []);

  return (
    <View>
      <Button
        title="Proceed to Checkout"
        disabled={loading}
        onPress={openPaymentSheet}
      />
    </View>
  );
};
This component fetches the necessary secrets, initializes the sheet when it first loads, and then presents it when the user is ready to pay. It’s a very clean and effective pattern.
Full Control with a Custom UI
But what if a pre-built screen doesn't fit your brand? Sometimes your app’s design is so unique that you need the payment form to feel like a native part of the experience. For that, Stripe gives you the CardField component.
CardField is a single, secure, PCI-compliant input field that you can place anywhere in your own custom layout. It gives you the freedom to build the entire checkout UI around it, perfectly matching your app’s branding.
This flexibility comes with more responsibility. You'll need to build the surrounding UI (like the "Pay" button and order summary), manage the form's state, and handle the payment confirmation yourself. It's the right choice for teams with specific UI/UX requirements.
For teams looking to streamline this custom build, you can check out how to convert Figma designs directly into React Native code to get a head start on your UI.
Let's walk through an example using CardField and the useConfirmPayment hook.
import React, { useState } from 'react';
import { View, Button, Alert } from 'react-native';
import { CardField, useConfirmPayment } from '@stripe/stripe-react-native';

const CustomCheckoutScreen = () => {
  const { confirmPayment, loading } = useConfirmPayment();
  const [cardDetails, setCardDetails] = useState(null);

  const handlePayPress = async () => {
    if (!cardDetails?.complete) {
      Alert.alert("Please enter complete card details.");
      return;
    }

    // 1. Fetch client secret from your backend
    const response = await fetch('YOUR_BACKEND_URL/create-payment-intent', {
      method: 'POST',
      headers: { 'Content-Type': 'application/json' },
    });
    const { clientSecret } = await response.json();

    // 2. Confirm the payment with card details
    const { error, paymentIntent } = await confirmPayment(clientSecret, {
      paymentMethodType: 'Card',
    });

    if (error) {
      Alert.alert(`Error: ${error.code}`, error.message);
    } else if (paymentIntent) {
      Alert.alert('Success', `Payment successful! ID: ${paymentIntent.id}`);
    }
  };

  return (
    <View>
      <CardField
        postalCodeEnabled={false}
        style={{ height: 50, marginVertical: 20 }}
        onCardChange={(details) => setCardDetails(details)}
      />
      <Button
        title="Pay Now"
        disabled={loading}
        onPress={handlePayPress}
      />
    </View>
  );
};
In this flow, we embed the CardField, track whether the user has filled it out completely, and then use the confirmPayment hook to securely finalize the transaction. It's more hands-on, but it gives you total control over the user experience.
Choosing Your Stripe UI Component
Deciding between PaymentSheet and a custom flow with CardField is a key product decision. Here's a quick breakdown to help your team choose the right tool.
| Feature | PaymentSheet | CardField & Custom Flow |
|---|---|---|
| Speed of Implementation | Very Fast. A few lines of code for a full UI. | Slower. Requires building your own UI and logic. |
| Customization | Limited. Basic branding and theme support. | Total Control. Seamlessly integrates with your UI. |
| Included Payment Methods | All-in-one. Cards, Apple Pay, Google Pay, etc. | Card-only by default. Other methods need custom code. |
| Maintenance | Low. Stripe maintains and updates the UI. | Higher. Your team owns and maintains the UI. |
| Best For | Getting to market quickly, standard checkouts. | Highly branded apps, unique checkout experiences. |
Ultimately, there’s no wrong answer. PaymentSheet is perfect for most applications, offering a robust and trusted solution with minimal effort. But if your brand identity is paramount, the extra work of building a custom flow with CardField is a worthwhile investment.
Managing What Happens After the Payment with Webhooks
Seeing that "Payment Successful" message pop up in your app feels great, but for your business, the work is just beginning.
It’s tempting to use that client-side success message to trigger order fulfillment, like shipping a product or granting access to a service. But what if the user’s network drops right after the payment goes through? Or they close the app immediately? You'd have the money, but your system would have no record of the completed order. This leads to frustrated customers and support tickets.
Why Webhooks Are the Gold Standard
This is where Stripe Webhooks are essential. A webhook is an automated message that Stripe’s servers send to your backend. The moment a payment succeeds (or fails, or is refunded), Stripe sends a notification directly to a dedicated endpoint on your server.
This server-to-server communication is far more reliable than relying on a signal from the user's phone. It's the official source of truth for every payment event.
Using webhooks means you're building a system that reacts to confirmed financial events directly from the source. This separates critical business logic, like fulfilling an order, from the unpredictable environment of a user's device. It's how you build a payment system that can scale reliably.
Your server’s job is simply to listen for these events from Stripe and then kick off the appropriate next steps.
Setting Up Your Webhook Listener
Creating a webhook listener is surprisingly straightforward. It’s just another API endpoint on your server, but instead of being called by your React Native app, it’s called by Stripe.
Here’s an example of what this looks like in a Node.js and Express backend, specifically listening for the payment_intent.succeeded event—Stripe's official signal that the payment has been successfully captured.
// Add this to your Node.js + Express server
const express = require('express');
const app = express();
const stripe = require('stripe')('sk_test_...');

// Important: Use express.raw to get the raw request body for signature verification
app.post('/stripe-webhook', express.raw({type: 'application/json'}), (request, response) => {
  const sig = request.headers['stripe-signature'];
  const endpointSecret = 'whsec_...'; // Get this from your Stripe Dashboard

  let event;

  try {
    // This function verifies the request actually came from Stripe
    event = stripe.webhooks.constructEvent(request.body, sig, endpointSecret);
  } catch (err) {
    // On error, return a 400 error and stop
    response.status(400).send(`Webhook Error: ${err.message}`);
    return;
  }

  // Now, handle the specific event type
  if (event.type === 'payment_intent.succeeded') {
    const paymentIntent = event.data.object;
    console.log('✅ PaymentIntent was successful!', paymentIntent.id);
    // TODO: Fulfill the order, send a receipt email, grant access, etc.
  }

  // Acknowledge the event with a 200 OK response
  response.send();
});
To get this working, you go into your Stripe Dashboard, create a new webhook endpoint, and paste in your server URL (e.g., https://your-api.com/stripe-webhook). Stripe will then give you the unique endpointSecret you need for the code above.
Always, Always Verify the Signature
Notice the stripe.webhooks.constructEvent line in the code? That is your most important security check. Without it, anyone could send a fake request to your /stripe-webhook URL and trick your system into shipping a product for free.
This function uses the special stripe-signature header from the request and your secret key to confirm, cryptographically, that the message is authentic. If the signature doesn't match, you must reject the request.
Once you’ve verified the webhook, you can confidently trigger your post-payment business logic:
- Update your database: Mark an order's status as
paid. - Grant access: Unlock the premium features the user just bought.
- Send receipts: Fire off a transactional email with order details.
- Update inventory: Decrement the stock count for a physical product.
For teams looking to streamline their accounting, this is also the perfect trigger for financial automation. A good Stripe and Xero integration guide can show you how to automatically create invoices and log payments in your bookkeeping software the moment a webhook arrives. This ensures your business operations and financial records are always in sync.
Testing Your Integration and Preparing for Launch
You've built the flow, but before launching your Stripe React Native integration, you need to make it bulletproof. This isn't just about checking if a payment goes through once; it’s about stress-testing every edge case to guarantee a smooth and secure experience for every user.
Stripe provides a fantastic sandbox for this. It's a dedicated test environment that behaves just like the real thing but uses test card numbers instead of actual money.

Simulating Real-World Scenarios
Your testing needs to cover more than just the "happy path." A solid plan ensures you're prepared for when things go wrong, which is critical for maintaining user trust.
Here's a practical checklist for testing:
- Successful Payments: Use the standard
4242...test card to confirm the entire flow works, from the payment sheet in the app to your webhook successfully fulfilling the order on the backend. - Card Declines: Don't skip this. Use Stripe's specific test cards for insufficient funds, incorrect CVC, and expired dates. Make sure your app displays clear, helpful error messages ("Your card was declined. Please try a different card.") instead of a generic "Payment failed."
- Authentication Flows (3D Secure): You must test Strong Customer Authentication (SCA). Use the test cards that trigger this flow to ensure your app correctly presents the authentication screen and handles the confirmation.
- Webhook Failures: What happens if your server is temporarily down? A good test is to take your webhook endpoint offline and make a payment. You should see the failed delivery attempts in your Stripe Dashboard, which lets you verify that Stripe will retry sending the event.
How you handle errors is a critical part of the user experience. A well-handled card decline builds more trust than a buggy success. For more insights, explore different user experience testing methods that you can apply to your payment flows.
From Test Mode to Live Payments
Once you're confident in your testing, it's time to go live. Switching from test to production is straightforward but requires careful attention.
First, toggle the "View test data" switch in your Stripe Dashboard to reveal your live API keys.
Next, swap out your keys. Replace the pk_test_... in your app and the sk_test_... in your backend environment variables with their live counterparts: pk_live_... and sk_live_....
Finally, update your webhooks. Go back to the Stripe Dashboard, configure your live webhook endpoint to point to your production server, and update the live endpoint secret in your backend environment.
This step-by-step process is crucial. With the cross-platform development world projected to grow at a 16.7% CAGR, building reliable, production-ready apps is more important than ever. Getting your payment system right is a huge part of that. Learn more about the latest React Native statistics to see just how much the ecosystem is expanding.
Common Questions and Sticking Points
We see a few questions pop up time and time again when teams are getting started. Let's tackle them head-on.
Can I Use Stripe React Native with Expo Go?
Yes, but with a small catch. The standard Expo Go app won't work out of the box because @stripe/stripe-react-native contains native code.
The solution is to create a custom development client. If you haven't done this before, don't worry—it's a well-documented process in the Expo ecosystem and it unlocks the full power of native libraries like Stripe's, giving you the best of both worlds.
Does My Backend Have to Be Node.js?
Absolutely not. We use Node.js and Express in our examples because they're common in the React Native world, but Stripe is incredibly flexible.
You can build your backend endpoints using any modern language. Stripe provides excellent server-side SDKs for:
- Python
- Ruby
- PHP
- Java
- Go
- .NET
The core logic is always the same: your server handles the sensitive operations (like creating the PaymentIntent), and your app just gets the client_secret it needs to complete the payment.
The single most important rule is that your backend—no matter what language it's written in—is the only place your Stripe secret key should ever live. It's also the sole authority on setting transaction amounts. This isn't just a best practice; it's essential for security.
Accelerate your mobile product development from idea to interactive prototype with RapidNative. Our AI-native builder transforms prompts, sketches, or designs into real, production-ready React Native code in minutes. Build your app faster today.
Ready to build your app?
Turn your idea into a production-ready React Native app in minutes.
Free tools to get you started
Free AI PRD Generator
Generate a professional product requirements document in seconds. Describe your product idea and get a complete, structured PRD instantly.
Try it freeFree AI App Name Generator
Generate unique, brandable app name ideas with AI. Get creative name suggestions with taglines, brand colors, and monogram previews.
Try it freeFree AI App Icon Generator
Generate beautiful, professional app icons with AI. Describe your app and get multiple icon variations in different styles, ready for App Store and Google Play.
Try it freeFrequently asked questions
What is RapidNative?
RapidNative is an AI-powered mobile app builder. Describe the app you want in plain English and RapidNative generates real, production-ready React Native screens you can preview, edit, and publish to the App Store or Google Play.
Can I export the code?
Yes. RapidNative generates clean React Native and Expo code that you can export at any time. No lock-in, no proprietary format. Hand it to your developers or keep building inside RapidNative.
Is RapidNative free to use?
Yes. You can build apps on the free plan with no credit card required. Paid plans unlock unlimited AI generations, code export, and direct publishing to the App Store and Google Play.
Do I need to know how to code?
No. Most users build apps by describing what they want in plain English. Developers can drop into the code whenever they want more control, but coding is optional.
How long does it take to build an app?
Most users have a working first screen in under a minute. A full MVP usually takes a few hours instead of the weeks or months traditional development requires.