How to Write Code for Mobile Apps the Production-Ready Way
Learn how to write code for mobile apps with a modern React Native stack. Covers components, NativeWind styling, state, routing, testing, and clean repo
By Sanket Sahu
2nd Oct 2026
Last updated: 2nd Oct 2026
You've seen the pattern. A founder or designer uses an AI app builder to turn a sketch into a convincing mobile prototype. The screens look right, navigation appears to work, and the team shares a preview link. Then the repository reaches an engineer, who finds placeholder data, duplicated components, unclear state, missing error paths, and a project that only works on the machine where it was created.
That gap is the real challenge in how to write code for mobile apps. AI can produce a useful starting point quickly, but production code needs clear boundaries, predictable behavior, tests, and a handoff another person can understand. The standard isn't whether a prototype looks finished. It's whether the code can survive change.
What Production-Ready Mobile Code Actually Means
“Production-ready” often means different things to different people. A founder may mean that the flow is convincing enough to validate the idea. A designer may mean that the interface matches the approved screens. A developer usually means the project can be maintained, tested, built, and released without discovering hidden assumptions.
Use a shared contract before anyone debates implementation. Mobile code is ready to move forward when it passes four checks:
- Deterministic behavior: The same user action produces an intentional result on iOS and Android, including loading, permission, offline, and rejected-request paths.
- Graceful failure states: Empty results, failed requests, expired sessions, and missing images have designed responses instead of blank screens or uncaught exceptions.
- A clean codebase: Dead files, commented-out experiments, demo screens, and duplicated logic have been removed or clearly isolated.
- A runnable repository: A new engineer can clone the repo, install dependencies, configure environment variables, start the app, and understand the first failure without private context.
This is a contract, not a wishlist. It gives a product manager something more useful than “the code feels messy” and gives a developer a concrete acceptance bar.
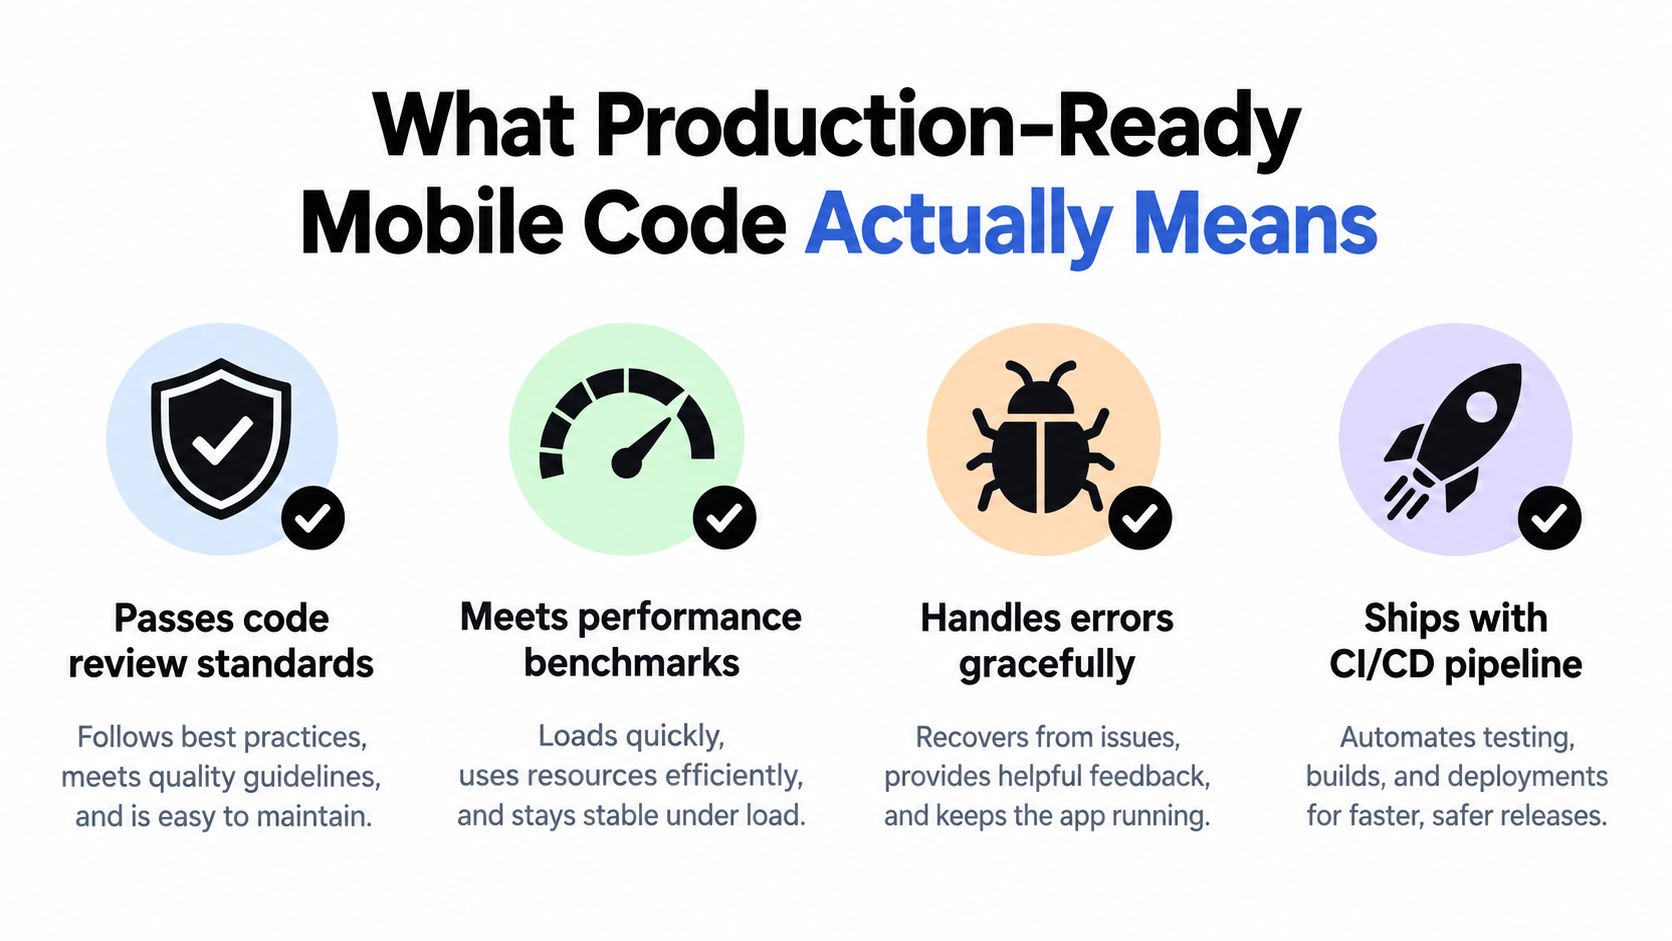
AI-generated prototypes usually fail at least one of these checks because they optimize for visible progress. They may create three slightly different button components, use sample data inside a screen, or assume every network request succeeds. That's useful during exploration, but it isn't a release standard.
Practical rule: If the team can't describe what happens when the network fails, the feature isn't finished.
The need for a shared standard is not new. FORTRAN, introduced at IBM on October 15, 1956, helped establish higher-level instructions instead of machine-code-only programming. LISP followed in 1959, showing that languages could support symbolic reasoning as well as numerical computation. The history of programming language development reinforces the same principle: useful code depends on abstraction and readability, not only on whether a machine can execute it.
For teams combining product design with engineering, a clear process for building apps with an agile partner can help expose these decisions before handoff. A practical companion is RapidNative's production-ready code guide, especially when a generated interface needs to become a repository another engineer can own.
Structuring Components and Files for a Real Project
A prototype often starts as one large screen because that's the fastest way to see an idea. A maintainable React Native app separates route concerns, reusable interface pieces, and domain logic before that screen becomes a dependency nobody wants to touch.
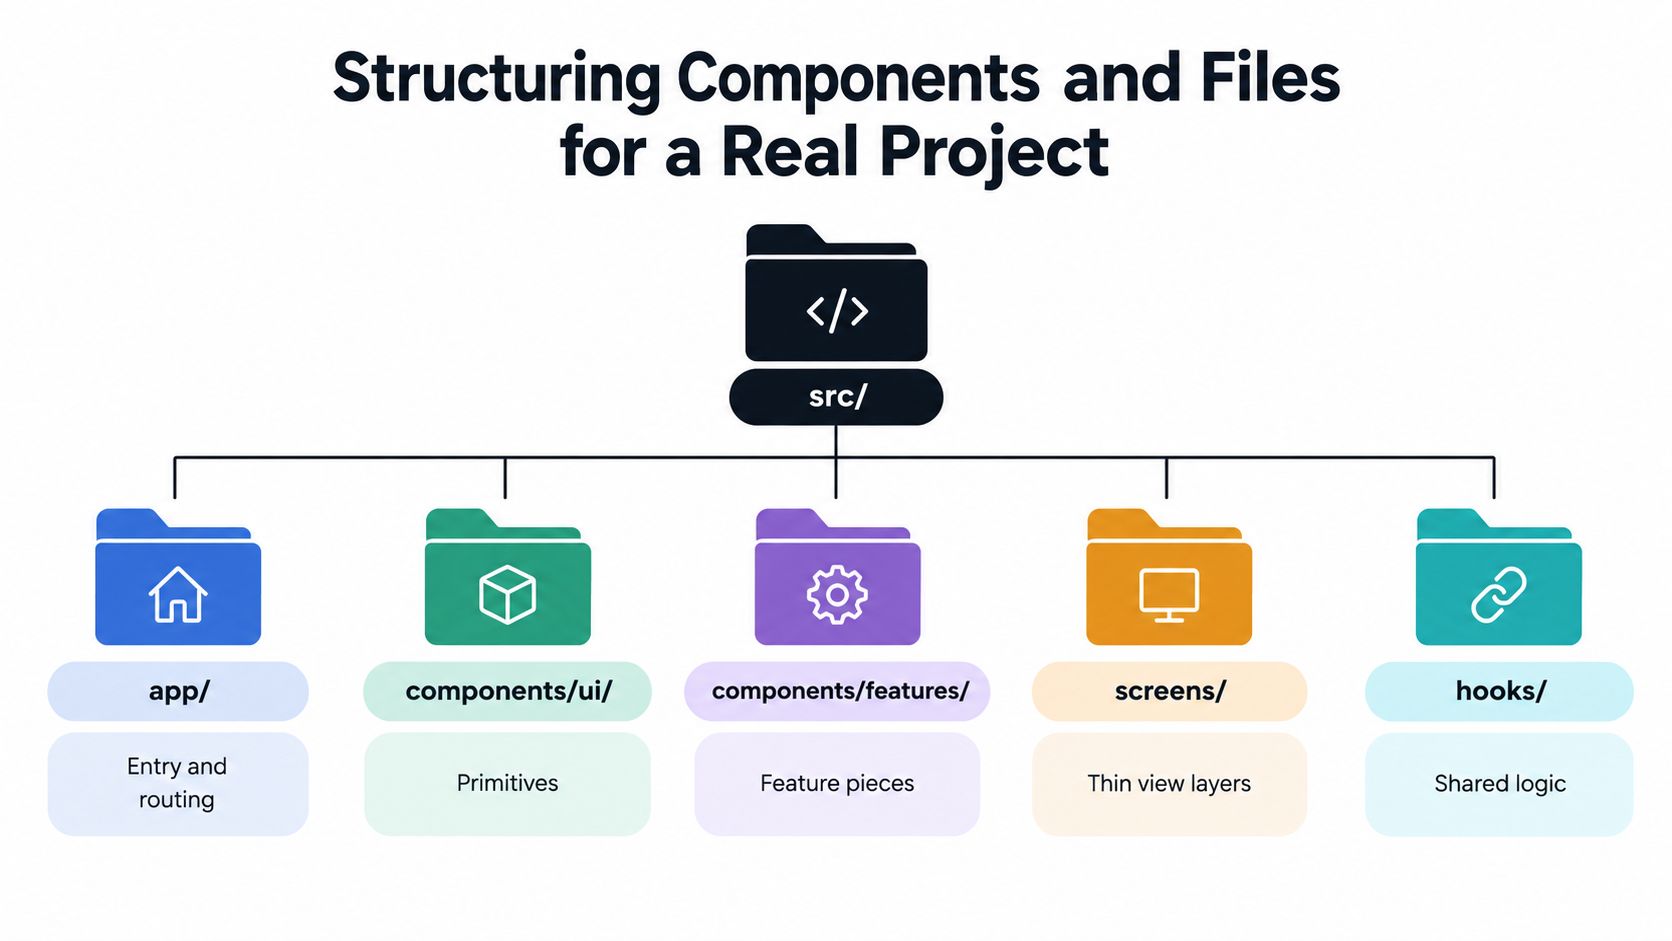
A workable starting layout looks like this:
app/contains the entry point, providers, and navigation setup.components/ui/holds primitives such as buttons, text fields, cards, modals, and loading indicators.components/features/contains domain-specific pieces such asUserCard,OrderSummary, orFeedItem.screens/contains thin route containers that compose features and respond to navigation.hooks/stores shared behavior such asuseUser,useAuth, oruseDebouncedSearch.lib/contains API clients, formatters, validation, storage adapters, and other utilities.assets/stores images, icons, fonts, and other static resources.
Keep a screen thin. A ProfileScreen should decide which state to render and connect navigation to the view. It shouldn't contain the complete user-fetching algorithm, avatar fallback rules, date formatting, and every visual style.
For example, the screen can import UserCard from components/features/UserCard and call useUser(userId) from hooks/useUser. The hook returns { user, isLoading, error, retry }, while UserCard receives a user object and presentation callbacks. This separation lets the developer test fetching logic without rendering the entire navigation tree.
Presentational versus container components
A presentational component receives props and renders an interface. It should have few reasons to change. A container component coordinates data, events, and state, then passes a focused contract to presentational children.
Lift a repeated block into a component when it has its own behavior, accessibility needs, or visual contract. Don't create a component just because a wrapper has one class name. A styled wrapper is often clearer when it has no independent meaning.
Barrel exports, such as a single components/index.ts, can make onboarding easier because imports look consistent. They can also obscure where code originates and interfere with tree-shaking when a barrel re-exports too broadly. Use focused barrels for a feature, not one global export file that hides the entire dependency graph.
For more context on reusable boundaries, see this explanation of component-based architecture.
Styling with NativeWind the Maintainable Way
NativeWind works well when the team treats utility classes as an implementation of a design system, not as an invitation to invent spacing on every screen. The first step is to define tokens for colors, spacing, typography, radii, and elevation in tailwind.config.js.
A token such as brand-primary should represent the same product decision everywhere. If one screen uses a hardcoded blue, another uses a slightly different blue, and a third uses an inline color value, the team has created visual drift that a designer must later correct manually.
Establish a small styling contract
Define the tokens first, then use them through className. A button might use classes such as rounded-button bg-brand-primary px-space-4 py-space-3, with text styled through a named typography token. The exact token names matter less than making them discoverable and consistent.
A button component should own its states:
- Default: Uses the primary background and readable foreground color.
- Pressed: Changes opacity or background through a defined interaction utility.
- Disabled: Blocks interaction and communicates unavailable state.
- Loading: Preserves the button's size while replacing its label with an activity indicator.
Compose classes from explicit conditions. A small cn helper is useful when variants combine several states, but don't hide every style decision behind an abstraction that takes longer to read than the class list itself.
Responsive utilities need a team-wide breakpoint contract. Decide what sm, md, and lg mean for the product, then apply those meanings consistently. React Native layouts don't become maintainable because a class name looks familiar. They become maintainable when the same utility produces an intentional result across supported screen sizes.
Avoid styling drift
Mixing a large inline style object with className makes precedence harder to reason about. Use inline styles for values that come from runtime calculations, such as an animated transform or a measured height. Keep static design decisions in NativeWind.
Dark mode needs the same discipline. A dark: class on one screen should not rely on a manually chosen background that conflicts with another screen's surface token. Test both themes while the component is isolated, not after every screen has developed its own interpretation.
The practical rule is simple: if a style repeats on three screens, it becomes a component, not a heading. A design token names a value. A component names a repeated behavior and visual contract. Teams can explore the relationship between natural-language design input and utility-based styling in this NativeWind workflow.
Picking the Right State Management for Your App
State management should follow the shape of the product, not a team's favorite library. A toggle, a form field, a cached API response, and a collaborative editing session are different problems. Treating them as one problem usually creates unnecessary ceremony early and painful rewrites later.
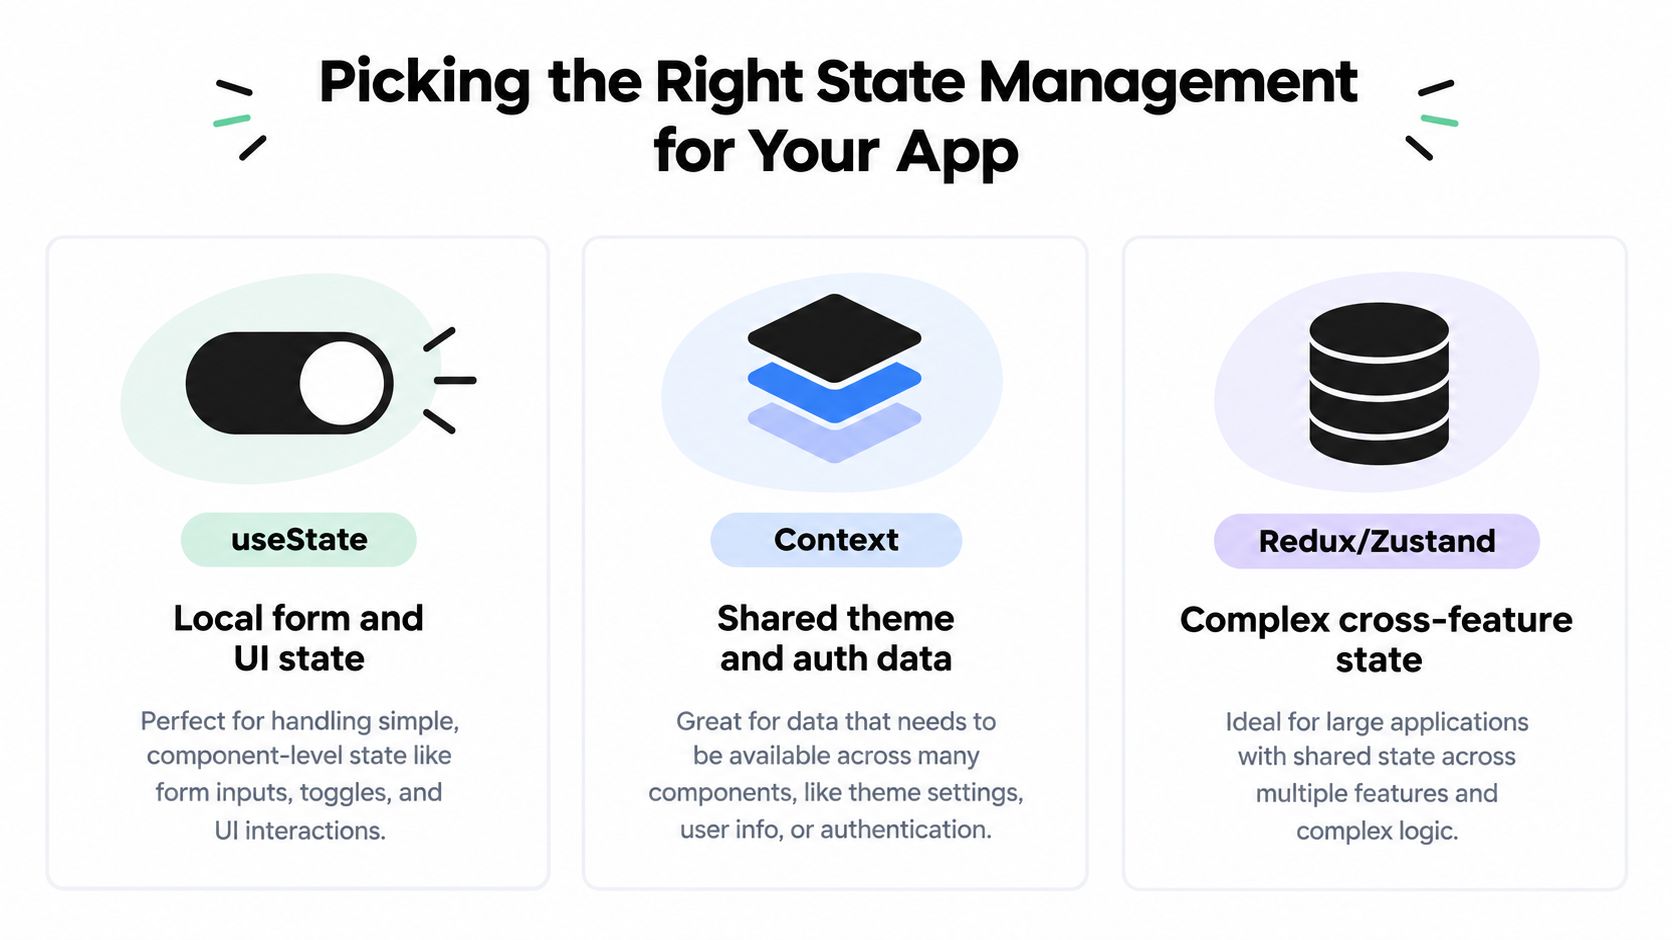
For local UI state, start with useState. A sign-in form, an expanded accordion, a selected tab, or a temporary filter belongs close to the component that owns it. Local state is easy to trace because the reader can see where it is created and changed.
Context fits cross-cutting values such as authentication, theme, locale, or feature flags. It becomes uncomfortable when teams use it as a general-purpose event bus. Large context values can trigger broad re-renders, while deeply nested consumers make dependencies harder to see. Async coordination and server cache invalidation are usually signs that the context has outgrown its job.
| App situation | Sensible starting point | Why |
|---|---|---|
| Single-user app with local flows | useState, perhaps a small Context | Few cross-feature dependencies |
| Multi-screen app with shared client state | Zustand or Redux Toolkit | Explicit shared updates and predictable ownership |
| Complex atom-oriented UI | Jotai | Small pieces of state can be composed independently |
| Product with substantial server data | A client store plus TanStack Query | Server cache needs fetching, invalidation, retries, and freshness rules |
A small Zustand store can be enough for a generated feed. Keep actions named after product behavior, such as setFeedItems, appendFeedItems, and clearFeed, rather than exposing arbitrary mutation methods. The feed screen reads the store, renders loading or empty states, and delegates the request to a hook or service.
Don't put every API response into Zustand by default. Once several screens need the same server data, you need cache keys, invalidation, request deduplication, and retry behavior. That is the point to evaluate TanStack Query rather than adding more actions to a client-state store.
Start with the smallest tool that solves today's problem, not the one that might scale in eighteen months.
A useful comparison is less about whether Redux Toolkit, Zustand, or Jotai is “best” and more about how clearly each one expresses ownership. Redux Toolkit offers structured slices and explicit reducers. Zustand stays lightweight for shared client state. Jotai can make independently changing atoms easy to compose. The right choice is the one your team can debug at the current product stage.
Routing, Navigation, and Screen Architecture
Routing should describe user intent, not merely list files. A stack navigator fits a sequence such as sign in, account recovery, and profile setup. Tabs fit peer destinations a user switches between repeatedly. A drawer fits secondary areas that should remain available without occupying the primary tab bar.
React Navigation supports these patterns, but the navigator should not become the place where feature logic accumulates. Keep route definitions close to the app entry and keep each screen responsible for its own data and presentation.
Type route parameters with TypeScript. A route named OrderDetails should declare the identifier it accepts, rather than allowing every caller to pass an untyped object. This catches drift between the screen and its callers when a parameter changes from orderId to another shape.
Use named route constants instead of scattering string literals through buttons and effects. Colocate local types, hooks, and feature components where that makes ownership obvious. A screen folder might contain OrderDetailsScreen.tsx, useOrderDetails.ts, OrderDetailsHeader.tsx, and types.ts. Shared primitives still belong in the shared component layer.
Make deep links testable
Deep links and universal links need an explicit mapping from an external URL to a navigation state. A linking configuration should define prefixes, route paths, and nested parameters. For example, a profile route might map a path such as profile/:userId to a screen that expects userId.
The common failure is configuring the route but forgetting the platform prefix, especially on iOS. Test a link from a cold launch, a backgrounded app, and an already open app. Also test an unknown path. A fallback screen or explicit not-found route makes dead links visible during development instead of turning them into silent navigation failures.

Before handoff, check four routing details:
- Route names: Defined as constants and used consistently.
- Parameters: Documented and typed at the navigator boundary.
- Ownership: Screen-specific logic is colocated, while shared pieces stay shared.
- Fallback behavior: Unknown routes render a deliberate recovery path.
A route map is part of the product model. If a PM can't explain where a deep link should land, the implementation is not ready for release review.
Testing and Quality Checks Before You Hand Off
Pre-handoff testing is a smoke net, not a coverage badge. Tests should protect behavior that matters to users and support teams, while leaving framework behavior to the framework.
Good unit-test candidates include pure functions, reducers, formatters, validation rules, permission decisions, and logic that has already become a recurring support issue. Skip pixel-perfect assertions that break whenever a designer adjusts spacing. Be cautious with screen snapshots that change frequently. A test that only proves React Native can render a view creates maintenance cost without protecting product behavior.
Test the boundary where failures happen
Jest paired with React Native Testing Library gives the team a practical unit and component-testing foundation. Mock the network layer, not only the component's return value. A realistic mock should cover a successful response, an empty response, a rejected request, and a slow request. That exposes whether the screen renders its loading, error, retry, and empty states.
Keep test names aligned with the feature and source file. A developer searching for useUser should quickly find useUser.test.ts, rather than a generic hooks.test.ts containing unrelated cases. Clear names help both people and code tools locate the intended behavior.
Add a lightweight end-to-end path with Detox or Maestro. The first-launch script should cover the three flows a new user must complete, such as opening the app, creating or entering an account, and reaching the primary product action. Don't automate every visual variation before the core journey is reliable.
A code-review study reports a median maximum acceptable review size of 800 source lines of code, and earlier research cited in that paper reports developers spend about 6.4 hours per week reviewing code. The same study recommends tracking review speed through time-to-merge, time-to-accept, and time-to-first-response, rather than using review speed as a single vague metric. See the code review study for that discussion.
Before handoff, confirm:
- CI status: Tests and lint pass in the same environment used for the repository.
- Warnings: The app starts without unresolved imports, console warnings, or red screens.
- Device behavior: A known-good debug build runs on a real iOS or Android device.
- Network paths: Success, empty, offline, timeout, and authorization failure states have been exercised.
Code quality has a measurable operational cost. An analysis of 30,737 files found that low-quality code contained 15 times more reported defects, required 124% more development time to resolve issues, and had 9 times longer maximum cycle times than high-quality code, according to the empirical code-quality analysis. That's why testing and cleanup belong before the repository changes hands, not after the first production incident.
AI makes verification more important, not less. In Stack Overflow's 2025 developer survey, 66% of developers said AI outputs are “almost right, but not quite,” while 45% said debugging AI-generated code is more time-consuming. Those findings are summarized in the 2025 developer survey. A prompt can produce a plausible screen. Only tests, review, and execution can establish whether it behaves correctly.
Exporting Your Code and Handing Off the Repo
A handoff is a release step, not a file drop. Export the app into a clean Git repository, then remove anything that existed only to make the prototype look complete.
Start with the repository itself. Delete demo screens, sample data, unused NativeWind classes, placeholder assets, duplicate icons, and abandoned experiments. Search for fake identifiers and hardcoded responses. If a screen still depends on a fixture, either replace it with the actual service boundary or label the dependency clearly in the known-issues list.
Commit .env.example, never real secrets. Add a sensible .gitignore for local environment files, build output, caches, and editor artifacts. Put repeatable setup tasks in a scripts/ directory, with commands for installing dependencies, starting the development server, running checks, and producing the expected debug build.
Give the next engineer a usable starting point
The README should answer practical questions without requiring a meeting:
- Which React Native, Expo, and NativeWind versions does the project use?
- What environment variables are required?
- How does a new developer install and run the app?
- Which screens are complete, partial, or still using fixtures?
- What known issues can the receiving team ignore temporarily?
- What are the first three engineering tasks after handoff?
Open one initial cleanup pull request. Keeping repository cleanup, generated-code review, and setup fixes together gives reviewers one coherent change to understand. Avoid scattering the handoff across many small PRs that force the receiving developer to reconstruct the intended baseline.
Expo's version alignment deserves a specific check. Expo SDK releases target a single React Native version, while React Native itself has six releases per year, according to Expo's version documentation. Expo also describes a three-month release cadence, with releases at the end of March, June, September, and December, preceded by beta versions in its React Native release guidance. Record the selected versions in the README and avoid upgrading during a handoff unless the upgrade is part of the agreed scope.
Mobile release confidence also depends on validation capacity. Sauce Labs reports that only 3% of organizations can release updates multiple times a week, 17% can release monthly, and nearly half can release monthly or slower in its 2025 State of Testing Report. The lesson for a product team is practical: don't promise a release cadence the test process can't support.
Schedule a 30-minute walkthrough with the receiving developer. Show the environment setup, the primary user journey, the known limitations, and the first open pull request. The PM can declare the handoff complete only when the fresh clone runs, the debug build installs on a real device, CI is green, secrets are excluded, and the next three tasks are written down.
RapidNative turns prompts, sketches, images, or PRDs into shareable React Native apps using Expo and NativeWind, then lets your team export editable code for the engineering workflow described above. Use RapidNative to validate the interface quickly, inspect the generated structure, and hand a developer a repository with a clear path from prototype to product.
Ready to build your app?
Turn your idea into a production-ready React Native app in minutes.
Free tools to get you started
Free AI PRD Generator
Generate a professional product requirements document in seconds. Describe your product idea and get a complete, structured PRD instantly.
Try it freeFree AI App Name Generator
Generate unique, brandable app name ideas with AI. Get creative name suggestions with taglines, brand colors, and monogram previews.
Try it freeFree AI App Icon Generator
Generate beautiful, professional app icons with AI. Describe your app and get multiple icon variations in different styles, ready for App Store and Google Play.
Try it freeFrequently asked questions
What is RapidNative?
RapidNative is an AI-powered mobile app builder. Describe the app you want in plain English and RapidNative generates real, production-ready React Native screens you can preview, edit, and publish to the App Store or Google Play.
Can I export the code?
Yes. RapidNative generates clean React Native and Expo code that you can export at any time. No lock-in, no proprietary format. Hand it to your developers or keep building inside RapidNative.
Is RapidNative free to use?
Yes. You can build apps on the free plan with no credit card required. Paid plans unlock unlimited AI generations, code export, and direct publishing to the App Store and Google Play.
Do I need to know how to code?
No. Most users build apps by describing what they want in plain English. Developers can drop into the code whenever they want more control, but coding is optional.
How long does it take to build an app?
Most users have a working first screen in under a minute. A full MVP usually takes a few hours instead of the weeks or months traditional development requires.